Creating a Simple Collection Class
Creating a group of objects that share common properties if one of the key features of Object Orientated programming. An object may represent real-life 'things' such as a person or vehicle, or business related objects such as a documents or reports. One of the simplest ways to create and retrieve such as group of objects is to create a Class in .NET.
Creating a Class
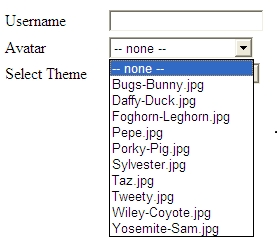
Our sample class represents Avatar images that can be associated with users of our website. We will use the image name as the name of the Avatar and all the images are located in the same folder on the web server.[hotellink:brisbane]
Select Add New Item from the Visual Studio IDE and create a new Class called Avatar. Visual Studio will create the shell for our new class, which includes a number of default Namespaces as well as the constructor for Avatar.
using System;
using System.Data;
using System.Configuration;
using System.Web;
using System.Web.Security;
using System.Web.UI;
using System.Web.UI.WebControls;
using System.Web.UI.WebControls.WebParts;
using System.Web.UI.HtmlControls;
/// <summary>
/// Summary description for Avatar
/// </summary>
public class Avatar
{
public Avatar()
{
//
// TODO: Add constructor logic here
//
}
}
As you already know methods in .NET can be overloaded. This means that we can create any number of public Avatar() methods depending on how we want the class to be called. In our example we will allow two ways to create a new Avatar, the first where the name will be set after the object is created and a second where the name is included in the initial call.
Add a private variable to the class that will hold the avatar name a new Property to enable the calling function to get and set the value of this variable. We could set the local variable _name to public so that we could access its value directly, however it is often better to wrap these values as Properties, so that we can add an validation or custom handling that may be required.
public class Avatar
{
private string _name;
....
public string Name
{
get { return _name;}
set { _name = value; }
}
}
We can know create a second constructor for Avatar with a parameter that sets the value of Name.
public Avatar(string AvatarName)
{
this.Name = AvatarName;
}
Create a Collection
A single Avatar object is not particularly useful, so we will build another class that enables us to quickly and easily add and remove Avatars to a list, or Collection. [silverlightslideshow:example]
Create a new Class called AvatarCollection. As we want this class to act as a collection of objects we need to ensure it inherits from System.Collections.CollectionBase.
using System;
using System.Data;
using System.Configuration;
using System.Web;
using System.Web.Security;
using System.Web.UI;
using System.Web.UI.WebControls;
using System.Web.UI.WebControls.WebParts;
using System.Web.UI.HtmlControls;
/// <summary>
/// Summary description for AvatarCollection
/// </summary>
public class AvatarCollection : System.Collections.CollectionBase
{
public AvatarCollection()
{
//
// TODO: Add constructor logic here
//
}
}
A simple collection needs to have functionality to add new items. remove a particular item and to return or retrieve a particular item. To enable this we add some very simple methods called Add, Remove and Item.
public void Add(Avatar av)
{
List.Add(av);
}
public void Remove(int index)
{
List.RemoveAt(index);
}
public Avatar Item(int index)
{
return (Avatar)List[index];
}
The Add method take an Avatar object as a parameter and adds it to the List (or Collection) or objects. As expected, the Remove method removes whatever object is located at the specified index position. Likewise the Item method returns an Avatar object located at the specified index position, notice that we have to explicitly cast the object to an Avatar as List can contain any object type.
In our example, we would like to create a method that pre-populates the List with all Avatars located within a specific folder on the web server. We can again overload the constructor AvatarCollection to call whatever methods we require.
public AvatarCollection(string FolderName)
{
GetAvatars(FolderName);
}
public void GetAvatars(string FolderName)
{
//retrieve an array of files from the directory
DirectoryInfo dir = new DirectoryInfo(System.Web.HttpContext.Current.Server.MapPath(FolderName));
FileInfo[] files = dir.GetFiles();
//create a new Avatar for each file and add to list
foreach (FileInfo file in files)
{
Avatar av = new Avatar(file.Name);
this.List.Add(av);
}
}
The AvatarCollection constructor calls the GetAvatars method which creates an Avatar object for each file in the specified folder and then adds it to the list. By making the GetAvatars method public, it can be called later, if the blank constructor is used. You may need to add some logic to delete any objects already in the list should the user call GetAvatars more than once.
Using the Collection
You can now make use the Avatar object and related collection within your code as a quick and easy DataSource. For instance, the code below sets the datasource of a drop-down list to an AvatarCollection.
AvatarCollection av = new AvatarCollection("avatars");
this.AvatarList.DataSource = av;
this.AvatarList.DataTextField = "Name";
this.AvatarList.DataBind();
N-Tier Architecture using Datasets
In our posts on using Datasets, Using Strongly Typed Datasets and Adding Additional Queries to a Dataset we outlined a simple 2-tier architecture. This may be suitable for many applications, however it is common to move larger and more complicated applications to an N-tier architecture. To achieve this we can add Business Logic Layer in between our application (the actual aspx pages) and the Data Access Layer containing our Datasets.
To seperate out layers in the web site, create a new folder called BLL under the App_Code folder. The image below shows the structure of the App_Code folder, with the documents that will be created in this post.
In the BLL folder add a new Class called CustomerData
We now need to add a reference to our DAL Customers dataset and implement a few methods to make the data available for use. The code snippet is shown below.
public class CustomerData
{
public CustomerData()
{
}
public Customers.CustomersDataTable GetAllCustomers()
{
CustomersTableAdapter adp = new CustomersTableAdapter();
return adp.GetData();
}
public Customers.CustomersRow GetCustomerByCustomerID(string ID)
{
CustomersTableAdapter adp = new CustomersTableAdapter();
return GetFirstRow(adp.GetCustomersByID(ID));
}
private Customers.CustomersRow GetFirstRow(Customers.CustomersDataTable table)
{
Customers.CustomersRow row;
row = table.Rows[0] as Customers.CustomersRow;
return row;
}
}
Basically we want to create methods in our BLL class that provide access to each method in the DAL dataset. So in our case we create firstly a method that returns all customers, calling the GetData() method. Secondly, we create a method that returns a single row based on the CustomerID and using the GetCustomersByID method of the Customers dataset. A helper method called GetFirstRow is used to grab just the first row from the DataTable that is returned my the GetCustomersByID method.
Once the CustomerData class has been built, it is a relatively simple task to bind the GridView on out CustomerList.aspx page to the class. Choose Configure Data Source from the ObjectDataSource and select Sample.BusinessLogicLayer.CustomerData from the dropdown list, and click next. In the Choose a method dropdown list, select the appropriate method, in this case GetCustomerByCustomerID.
The Parameters remain unchanged so you can click Next and then Finish. Run the page to see the results.
Adding Additional Queries to a Dataset
In our first post on 2-tier architecure Using Strongly Typed Datasets, we created a very simple dataset based on the Customers table in the Northwind database. We are now going to expand upon this simple dataset and add the abilty to return records based on parameters, such as CustomerID.
Opne the Customers.xsd Dataset we created in the previous post and right mouse click on the CustomersTableAdapter heading to open the popup menu. Select Add Query to launsh the TableAdapter Query Configuration Wizard.
- Choose Use SQL statements
- Choose the SELECT with returns rows option
- Type the following SQL statement and click next
SELECT CustomerID, CompanyName, Address, City, PostalCode
FROM Customers
WHERE CustomerID=@ID
Unselect the Fill a DataTable option and rename the Method GetCustomersByID, click next and finish.
Build the web site to cofirm it compiles and then open the CustomerList.aspx file we created in the first post. To utilise our new query that expects a CustomerID, we need to add some extra fields to the page. Add a textbox called txtCustomerID and a button called btnSearch.
Next we need to bind the GridView to the new datatable, so select Configure Data Source from the ObjectDataSource Tasks popup. click through until you get the the Define Data Methods page of the wizard. In the Choose a Method dropdown list you will see that we now have two methods available. Select the GetCustmersByID() method.

Next we need to define where the data for the parameter @ID will come from. In the Define Parameters screen there are a number of source, including QueryString and Session objects, as well as an option to select a control. We will be getting our information from the textbox called txtCustomerID, so go ahead and define the parameter as shown below. Although it's not manditory, it will be easier to assign a default customerID so that when the page loads the GridView will display one record. If we did not want to select a default value, we would have to handle binding via code, so that we did not attempt to bind the GridView to an empty datatable.
Run the page and check the results. You should see the GridView populated with the record for customer Alfreds Futterkiste.
If you enter a different CustomerID, for instance BOTTM and click the button, the page will pstback and display the record for Bottom-Dollar Markets.
Obviously this is a very limited search option, as we need to know the exact customerID to search for. With a little more tweaking, it would be easy to add wildcards to our query or to even add the ability to search on more than one field, so have fun.
Using Strongly Typed Datasets
Creating and using a strongly-typed Dataset in ASP.NET provides an effective 2-tier architecture. Using the Northwind SQL Server database, in this post we will create a simple Dataset for use with some data-bound controls on an ASP.NET webpage.
To get started, add a folder called DAL, short for Data Access Layer, under the App_Code folder in a standard ASP.NET Web Site. In this folder, create a new Dataset called Customers.
Visual Studio will create the Dataset and launch the TableAdapter Configuration Wizard to guide you through the process of setting up the Dataset.
- Select an existing Connection, or if you haven't got a connection to Northwind already saed, hit the New Connection button.
- Choose the Use SQL statements option
- Enter the following SQL statement, or click the Query Builder button to visually create a simple SELECT query.
SELECT CustomerID, CompanyName, Address, City, PostalCode
FROM Customers
Visual Studio creates the Dataset complete with a TableAdapter. Build your web site, to make sure it compiles.
To show how easy it is to use this Dataset, create a new blank page in your ASP.NET web site called CustomerList and drag in a GridView control from the Toolbox. From the GridView Tasks popup, select <New Data Source> from the Choose Data Source drop-down list. The Data Source Configuration Wizard will open prompting you to select the source of your data. Normally you probably selected Database to connect to a SQL Server database, but to use our new Customers Dataset we need to select Object.
From the list of objects, select the CustomerTableAdapter.
Next, the wizard will display all the available methods that return DataTables. In our case there is only one, called GetData.
That's all there is to do. Our GridView is now bound to the DataSet. Fire up the webpage and see the results.
Raising Events from Master Pages
In the post on Adding Custom Events to Web User Controls we looked at how we could access events raised by controls within a Web User Control. This worked perfectly on our single default.aspx page, but in more complex websites using Master and Content Pages, we need a slightly different approach. In the first scenario, imagine we have a Web User Control located on a Master Page and we want the content to change when an event is raised.
To get started, review the previous posts. Then add a new Master Page called Default.Master to your project by selecting Add New Item from the Website menu.
Drag and drop the CustomDropDown Web User Control onto the design surface of Default.master. Put it above the ContentPlaceHolder as we will be changing the results selected in the ContentPlaceHolder depending on the value selected in CustomDropDown.
Next create a new blank web page called Results.aspx, making sure to select Default.master as the master page.

Next we will add a label on the design surface of Results.aspx. The label will be used to display the name selected in the CustomDropDown, similarly to how the label operated in Adding Custom Events to Web User Controls. To be able to access the selected value of CustomDropDown, we need to make a few changes.
Firstly, we need to add some extra code to create a constructor for our CustomDropDownEventArgs class so that we can raise events using delegation.
Public Sub New(ByVal EmployeeID As String, ByVal EmployeeName As String)
_payrollID = EmployeeID
_fullname = EmployeeName
End Sub
Raising the event in Default.aspx is similar to how we raised the event in the single page in previous posts. We need to create a method that handles ListChanged - for now, simply cut and paste the code from the previous post into the code behind for Default.master.
Private Sub CustomDropDown1_ListChanged(ByVal sender As Object, ByVal e As CustomDropDownEventArgs) Handles CustomDropDown1.ListChanged
Me.Label1.Text = e.FullName
End Sub
Switch to source view and register the CustomDropDown control
<%@ Register TagPrefix="myControl1" Namespace="Acme" Assembly="App_Web_customdropdown.ascx.6bb32623" %>
Then add the custom control and a label that you will use to show that the event has been raised.
<myControl1:CustomDropDown ID="CustomDropDown1" runat="server" />
<asp:Label ID="Label1" runat="server" Text="Label"></asp:Label>
If you run Results.aspx, you will see that all the functionality is already working in the master page, but as yet we haven't done anything to display the results in the content page.
To achieve this, add a reference into the Source view of Results.aspx, so that we can directly refer to the master page programmatically. Insert the reference tag just below the page directive.
<%@ MasterType virtualpath="~/Default.master %>
So that we can access the details of the event raised by the CustomDropDown control on our master page we need to create a publically accessible method that returns the Event.
Public Event SearchCompleted As StaffSearchEvent
We can then re-point the event handler in Default.master to the newly delegated ListChanged Event.
Imports Acme.CustomDropDown
Partial Class _Default Inherits System.Web.UI.MasterPage
Private Sub CustomDropDown1_ListChanged(ByVal sender As Object, ByVal e As CustomDropDownEventArgs) Handles CustomDropDown1.ListChanged
Me.Label1.Text = e.FullName
RaiseEvent ListChanged(Me, New CustomDropDownEventArgs(e.PayRollID, e.FullName))
End Sub
Public Event ListChanged As CustomDropDownEvent
End Class
Now to refer to the events arguments in the content page, we add add an event handler into the Page_Init sub of Results.aspx and create a call to a private function that displays the selected name in the label on out content page.
Imports Acme.CustomDropDown
Partial Class Results
Inherits System.Web.UI.Page
Protected Sub Page_Init(ByVal sender As Object, ByVal e As System.EventArgs) Handles Me.Init
AddHandler Master.ListChanged, AddressOf ListChanged
End Sub
Private Sub ListChanged(ByVal obj As Object, ByVal e As CustomDropDownEventArgs)
Label1.Text = e.FullName
End Sub
End Class
Now when we run Results.aspx and select a value from the drop down list, three actions are being taken. First within the Web Custom Control the drop down list SelectedItemChanged event is raised, displaying the employee ID in a label. Next, the same event is captured by Default.master and the selected name is displayed in a label to the right of the Web Custom Control. Lastly, the content page also captures the same event and displays the selected name in a label below the Web Custom Control.
Saving a Web User Control as a reusable DLL
If you have been folowing the previous posts you would now have successfully created a simple Web User Control and used it within a single page website. In the first post we created the Web User Control named CustomDropDown. In the second and third posts we added Events to the CustomDropDown control. The final step in the process is to make this control easily reusable across a multitude of web sites. To do this, we compile the Web User Control as a dll.
Creating a DLL from a Web User Control
Before we set about saving the CustomDropDown control as a dll, we need to make some small changes. The first is to add a ClassName to the @Control directive in the CustomDropDown.ascx file.
<%@ Control Language="VB" AutoEventWireup="false" ClassName="Acme.CustomDropDown" CodeFile="CustomDropDown.ascx.vb" Inherits="UserControls_CustomDropDown" %>
Secondly, to ensure that the custom Event class CustomDropDownEventArgs is accessable from the DLL, we need to copy the code from the class .vb file into the CustomDropDown.ascx.vb file. Make sure you copy the complete class code - i.e. everything including the Public Class CustomDropDownEventArgs tags. The complete code for the CustomDropDown.ascx.vb file is shown below.
Partial Class UserControls_CustomDropDown
Inherits System.Web.UI.UserControl
Public Event ListChanged(ByVal sender As Object, ByVal e As CustomDropDownEventArgs)
Protected Sub DropDownList1_SelectedIndexChanged(ByVal sender As Object, ByVal e As System.EventArgs) Handles DropDownList1.SelectedIndexChanged
Me.Label1.Text = Me.DropDownList1.SelectedValue
Dim myEvent As New CustomDropDownEventArgs()
myEvent.FullName = Me.DropDownList1.SelectedItem.Text
myEvent.PayRollID = Me.DropDownList1.SelectedItem.Value
RaiseEvent ListChanged(sender, myEvent)
RaiseEvent ListChanged(sender, myEvent)
End Sub
End Class
Public Class CustomDropDownEventArgs
Private _fullname As String
Private _payrollID As String
Public Property FullName() As String
Get
Return _fullName
End Get
Set(ByVal value As String)
_fullname = value
End Set
End Property
Public Property PayRollID() As String
Get
Return _payrollID
End Get
Set(ByVal value As String)
_payrollID = value
End Set
End Property
End Class
We can now build and publish the website using the commands in Visual Studio.
- Un-tick the Allow this precompiled site to be updatable, this ensures that everything, including the mark-up on the ascx page is compiled.
- Tick the Use fixed naming and single page assemlies, this will ensure that the ascx file, including the code behind file will be saved in its own DLL and not compiled with any other elements.
Adding the DLL to a new Website
Once you have published the control, you can now add it to a new or existing website. To utilise the control, simply use the Add Reference command and browse to the location where you published the website in the step above. The DLL's will be saved under the \bin folder.
To include the control on a page in your new website you need to add two lines of code to the source. The first line registers the control and is similar (but not identical) to the @Register directive added automatically by Visual Studio when you drag and drop the Web User Control onto a page.
<%@ Register TagPrefix="myControl1" Namespace="Acme" Assembly="App_Web_customdropdown.ascx.6bb32623" %>
Two things to note about the above tag, firstly make sure the Namespace element matches the namespace you added to the Classname element in the previous steps and you only need to inlcude the root Namespace component of the Classname. The second it that the Assemby name must match the DLL name that you added a reference to, but does not include the file extension '.DLL'.
Once you have set up a reference and registered it on the page, you can add the tag whereever you need the control to appear in your mark-up. While you are there, add a label control to the page so that you can test the Event handling
<myControl1:CustomDropDown ID="CustomDropDown1" runat="server" /> <asp:Label ID="Label1" runat="server" Text="Label"></asp:Label>
Adding Custom Event Handling
The final step is to add the custom event handling we outline in Adding Custom Events to Web User Controls As we named the control the same as the Web User Control in the previous post, we can simply cut and past the CustomDropDown1_ListChanged code from the default.aspx page into our new page.
Private Sub CustomDropDown1_ListChanged(ByVal sender As Object, ByVal e As CustomDropDownEventArgs) Handles CustomDropDown1.ListChanged
Me.Label1.Text = e.FullName
End Sub
Adding Custom Events to Web User Controls
In a previous post we investigated how to handle events raised by a Web User Control on the page containing the control. If you need a refresher, check out the post Adding Events to Web User Controls in VB.NET
In our previous posts we have been creating a Web User Control named CustomDropDown that contains a dropdownlist containing employee names and payroll numbers. In the first post we added an event to the CustomDropDown that displayed the PayrollID of the selected employee in a label control within the Web User Control itself. In the next post, we expanded upon this so that when a new employee is selected, a label on the page containing CustomDropDown displays the text 'List Changed'. In this post, we now want to add functionality that will display the details of the employee in a label on the page containing CustomDropDown.
The first step is to create a new Class containing the code that will provide the information we want on the page. Go to the Website menu and select Add New Item, then choose the Class item and enter the Name 'CustomDropDownEventArgs'. If you are prompted to add the code to the App_Code folder, choose Yes.
The CustomDropDownEventArgs class will consist of two public properties that will be populated by the controls on the CustomDropDown Web User Control. At this stage, all we need to do is create the properties, as the Event Handler will call this class from the CustomDropDown control.
Public Class CustomDropDownEventArgs
Private _fullname As String
Private _payrollID As String
Public Property FullName() As String
Get
Return _fullName
End Get
Set(ByVal value As String)
_fullname = value
End Set
End Property
Public Property PayRollID() As String
Get
Return _payrollID
End Get
Set(ByVal value As String)
_payrollID = value
End Set
End Property
End Class
We now need to modify the code behide CustomDropDown so that the ListChanged Event we created in the previous post now includes the new CustomDropDownEventArgs class.
Public Event ListChanged(ByVal sender As Object, ByVal e As CustomDropDownEventArgs)
We will also need to change the SelectedIndexChanged event for the DropDownList, so that it will popluate the CustomDropDownEventArgs with its current values.
Protected Sub DropDownList1_SelectedIndexChanged(ByVal sender As Object, ByVal e As System.EventArgs) Handles DropDownList1.SelectedIndexChanged
Me.Label1.Text = Me.DropDownList1.SelectedValue
Dim myEvent As New CustomDropDownEventArgs()
myEvent.FullName = Me.DropDownList1.SelectedItem.Text
myEvent.PayRollID = Me.DropDownList1.SelectedItem.Value
RaiseEvent ListChanged(sender, myEvent)
End Sub
That's all we need to do in CustomDropDown.ascx, so we can make a few changed to the page containg the Web User Control, named default.aspx.
First, we modify the CustomDropDown1_ListChanged event to handle the class we created. We can then add code to this event to display the values returned from this class, which have been populated by the Web User Control.
Private Sub CustomDropDown1_ListChanged(ByVal sender As Object, ByVal e As CustomDropDownEventArgs) Handles CustomDropDown1.ListChanged
Me.Label1.Text = e.FullName
End Sub
Now when we build and run the default.aspx page and select an employee, the SelectedIndexChanged event is raised within the Web User Control and the name of the employee is displayed in a label on the page.
Adding Events to Web User Controls in VB.NET
In a previous post, Creating Web Custom Controls in VB.NET we discussed how to create a very simple Web User Control, including how to respond to events raised by the controls contained within the Web User Control. In this post, we are going to extend upon this functionality and disuss how to handle events raised within the Web User Control from the page containing the the control. In otherwords, we want to learn how to tell the containing page when an event within the Web User Control has been raised and carry out some processing based on the results.
Firstly, we will need to make some changes to our Web Custom Web Control, code behind file named CustomDropDown.ascx.vb. To start with, we will declare a public Event called ListChanged.
Public Event ListChanged(ByVal sender As Object, ByVal e As EventArgs)
We then modify the DropDownList SelectedIndexChanged event to raise our new public Event.
Protected Sub DropDownList1_SelectedIndexChanged(ByVal sender As Object, ByVal e As System.EventArgs) _
Handles DropDownList1.SelectedIndexChanged
Me.Label1.Text = Me.DropDownList1.SelectedValue
RaiseEvent ListChanged(sender, e)
End Sub
Now we can make use of the ListChanged Event within the containing page, in this case the default.aspx page. When we dragged the CustomDropDown control onto the design surface of the dafault.aspx page Visual Studio added a few lines of code to the source view. By default, it named our control CustomDropDown1 and registered the control within a Page declaration. Start by adding a label to default.aspx in which we can display a message when the event is raised.
In the code behind page, default.aspx.vb, we can add some code to handle the ListChanged Event.
Private Sub CustomDropDown1_ListChanged(ByVal sender As Object, ByVal e As EventArgs) Handles CustomDropDown1.ListChanged
Me.Label1.Text = "List Changed"
End Sub
When you build and run the page and select an emplyee, the employees PayrollID is displayed in the label inside the Web User Control as implemented in the previous post, but now we also have a second label that displays the text 'List Changed' after we have selected an employee. This simple example shows how it possible to handle a sinigle event within the Web User Control, in this case the SelectedIndexChanged event, from both inside the control and on the containing page.
In the next post we will expand upon this functionality and learn how to create and handle custom events for Web User Controls.
Creating Web User Controls in VB.NET
Visual Studio provides a quick and simple way to create controls that can be reused on any page and across multiple applications. These are called Web User Controls and are similar to standard ASP.NET pages in that they can contain other controls, such as TextBox's and ImageButtons. One difference is the the Web User Control cannot be opened directly in a browser and must be contained within another page, as it does not contain HTML page tags of its own.
This simple tutorial will show you how to create a new web user control and add it to a standard ASP.NET page.
Creating the Web User Control
Create a new folder in your project to strore your web user controls, in this example we will create a folder called UserControls
From the Website menu, select Add New Item and choose Web User Control. Name your new control, in this example we are creating a resuable DropDownList so we will name the control CustomDropDown.
In the design surface of the of the CustomDropDown.ascx you can drag and drop any of the standard ASP.NET controls. We will drag a Label and a DropDownList. From the DropDownList Tasks popup menu, select Choose Data Source and add the details to retrieve data from your database. In this exa,ple we are retrieving a list of employees from a SQL Server database, so we set the display field to 'FullName' and the value field to 'PayrollID'
Adding the Web Custom Control to and Existing Page
That's all we need to do to our web user control for the moment, so its time to add it to our default.aspx page to test it out. Open the default.aspx page in design view and simply drag and drop the CustomDropDown.ascx file into the design surface.

Once you have added the custom control, press F5 to build and run the dafault.aspx page. You should see the label and dropdownlist populated with your data from the database.
Responding to Events inside a Web Custom Control
As mentioned earlier, a Web Custom Control is very similar to a standard ASP.NET Page and can contain any number of other controls. The Web Custom Control can also respond to events raised by the control it contains, just like a standard ASP.NET page.
Going back to our CustomDropDown.ascx control we are going to add an event that will display the PayrollID of the employee selected in the dropdownlist. First, make sure that the dropdownlist is set to automatically postback, so that the SelectIndexChanged event fires when the user selects the name of an employee. Then add this code to you code behind page CustomDropDown.ascx.vb
Protected Sub DropDownList1_SelectedIndexChanged(ByVal sender As Object, ByVal e As System.EventArgs) Handles DropDownList1.SelectedIndexChanged
Me.Label1.Text = Me.DropDownList1.SelectedValue
End Sub
Now when we run the default.aspx page, whenever a new employee is selected, their PayrollID is displayed in the label. Yes I know, this is hardly very exciting, but it demonstrates how easy it is to respond to events raised by controls within the Web User Control.
In a future post, we will look at how we can respond to events raised by the Web user Control from the page containing the control, for example if we want to show the name of the employee in a TextBox located on the default.aspx page. We will also look at how to send information to the Web User Control from the containing page, such as connection strings, which is very handy when you want to reuse the control with a different datasource.
Retrieving data from a SQL Server Database
As discussed in Retrieving Data from an Access Database, the DataReader object is one of the easiest ways to programmatically read data from a databace. The same is true for returning rows of data from a SQL Server database. A brief overview of what is required to retrieve data from a SQL Server database is as follows:
- Create a connection to the database
- Create a SQL query, with or without parameters, to access the required data
- Assign the SQL Query to a SQLCommand object
- Execute the SQLCommand to retrieve the records
Steps 1 to 3 have been covered in the posts detailing how to connect to a SQL Server Database and how to add parameters to a SQL Server query. The code snippet below assumes that you have read and understand those posts, so if you don't it's time to go back and familiarise yourself again.
'declare a DataReader
Dim dr As SqlDataReader 'For a SQL Server database
'populate the datareader with the results of the command
dr = cmd.ExecuteReader()
'create a loop to read values from the datareader
While dr.Read()
'gain access to the fields using something like below
Dim strValue As String = dr(fieldname).ToString()
End While
'close the read when done
dr.Close()