Using Business Objects with the WP7 Map Control
One aspect of creating and adding pushpins to the Windows Phone 7 Map control that turned out to be a welcome revelation to me is that most geo-centric Business Objects can be used as the data source for the pushpin layer with little or no modification.
In a previous post we looked at how easy it was to add a single pushpin to the Map control. If we look at that method again, we see that all we really need is a geographical location. This means that as long as your object has a Latitude and Longitude, you can use it as a pushpin.
This was very handy in TrafficMATE especially when displaying camera locations on a map. The Camera object model we created already contained the Lat/Long of the camera. This meant that I could easily use a List<Camera> object as the ItemSource for the pushpin layer.
Here’s the xaml for a map showing camera locations.
<my:Map x:Name="CameraMap"
CredentialsProvider="{Binding CredentialsProvider}"
CopyrightVisibility="Collapsed"
LogoVisibility="Collapsed"
ZoomLevel="16">
<my:Map.Foreground>
<SolidColorBrush Color="{StaticResource PhoneForegroundColor}"/>
</my:Map.Foreground>
<my:MapItemsControl x:Name="PushpinItems" Height="300">
<my:MapItemsControl.ItemTemplate>
<DataTemplate>
<my:Pushpin Location="{Binding Location}" >
</my:Pushpin>
</DataTemplate>
</my:MapItemsControl.ItemTemplate>
</my:MapItemsControl>
</my:Map>
The code that is of interest to us is the section defining the MapItemsContol named PushpinItems. Just like the other WP7 databindable controls, the MapItemsControl supports an ItemTemplate, which in this example is made up of Pushpin controls.
The Location property of the Pushpin, which is of type GeoCoordinate, is bound to a field in our data source called ‘Location’. All we need to support binding is ensure our business object exposes a GeoCoordinate property and we are good to go. A simplified version of the Camera object is shown below.
public class Camera
{
public string Name { get; set; }
public string Description { get; set; }
public double Latitude { get; set; }
public double Longitude { get; set; }
public GeoCoordinate Location
{
get { return new GeoCoordinate(this.Latitude, this.Longitude); }
}
}
With the help of an async call to a webservice, I populated a List<Camera> with relevant results and was able to set the ItemSource for the pushpin layer using something like:
PushpinItems.ItemsSource = cameras;
The key benefit of binding your objects directly to the pushpin layer is that you have direct access to the object whenever you select a pushpin. There is no need to make a second trip to the webservice when the user selects a pushpin - you already know everything there is to know about the underlying object. In a future post, I will explore how you can retrieve the underlying information from a Pushpin created using your business objects.
Augmented Reality#3: Using the Geo AR (Augmented Reality) Toolkit
Now if you have been following along on some of my previous posts about Augmented Reality (AR), you’ll know that the Mango release of Windows Phone offers some great support for developers. So far we have looked at displaying the live video feed from the VideoBrush and also added some Accelerometer features to create a see-through spirit level.
With the release of the Geo Augmented Reality Toolkit (GART), many of the operations required to show geographical points in relation to the user’s current position have been greatly simplified.
First things first, you’ll need to download the GART binary from Codeplex. There are also a number of samples available for download which will help you on your way. Once you’ve downloaded and extracted the dll, you can add a reference to GART into your existing projects and be on your way to easier Augmented Reality apps.
Start a new Silverlight for Windows Phone – Windows Phone Application project in Visual Studio. Make sure to select Windows Phone 7.1 for the OS when you are offered the choice.
Add a reference to GART to your project and add a the following to you MainPage.xaml
xmlns:ARControls="clr-namespace:GART.Controls;assembly=GART"
You will also need to add a reference to System.Device to be able to include Location functionality, such as the GeoCoordinate class.
At the heart of GART is the ARDisplay control, which packages together a number of UI elements, as well as lots of complex calculations to make working with AR apps very easy. The first UI elements we will look at are the OverheadMap and WorldView components.
The OverheadMap element renders just like the regular Map control and displays a Bing map. The WorldView element displays the geographical points in three dimensional space and lies at the heart of any good AR app.
The simplest way to get started with GART is to start by adding a few GeoCoordinate points to the ARDisplay control and checking the results using the OverheadMap UI element. To achieve this, add the ARDisplay control to your MainPage.xaml.
<Grid x:Name="ContentPanel" Grid.Row="1" Margin="12,0,12,0">
    <ARControls:ARDisplay x:Name="ARDisplay" d:LayoutOverrides="Width">
        <ARControls:OverheadMap x:Name="OverheadMap" />
        <ARControls:WorldView x:Name="WorldView" />
    </ARControls:ARDisplay>
</Grid>
In the code behind, add a few points that you want to show as labels on your new AR app. If you are using the emulator your “current” location will be set to the Microsoft campus in Redmond, so make sure the points you select are located nearby. Currently the Worldview only shows points within 100 meters of your current location.
You can use the AddLabel code from the GART samples to display the GeoCoordinate points you create using this sort of code;
GeoCoordinate pt4 = new GeoCoordinate(47.64523, -122.14090);
AddLabel(pt4, "Studio E");
Now that we have some geographical points we want to display and have set the current location to use for the centre of the ARDisplay, all that is left is to tell the ARDisplay to start running - you can add this code the OnNavigateTo event if you always want to start the control.
protected override void OnNavigatedTo(System.Windows.Navigation.NavigationEventArgs e)
{
// Start AR services
ARDisplay.StartServices();
base.OnNavigatedTo(e);
}
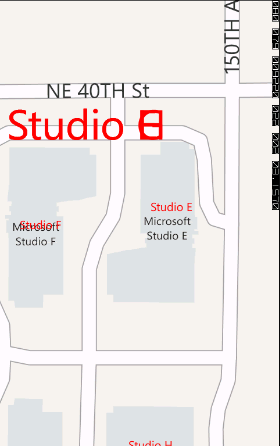
Run the project, but be warned, AR functionality is really only useful when testing on a real device. If you are using the emulator you will get the great map shown below, complete with some strange text that overlaps each other.
Adding a Map to your WP7 App
My recent TrafficMATE Windows Phone 7 app heavily utilised the Bing Maps control for WP7. It was used to plot route in combination with the Bing Maps Route Service API, as well as to show the location of traffic cameras.
The easiest way to get started with the Maps control for Windows Phone is to take a look at the tutorials found in the Labs provided by Microsoft. If you just want to throw up a map to display a single geographic point, then here’s how to start.
Add the control to your xaml
The Map control resides in the Microsoft.Phone.Controls.Maps library, so you will want to add a reference to this library into your project. You will also want to create a namespace reference in the XAML page where you want to use the map control.
xmlns:msmap="clr-namespace:Microsoft.Phone.Controls.Maps;assembly=Microsoft.Phone.Controls.Maps"
You can then add the map control to your xaml.
<msmap:Map x:Name="routeMap"
CredentialsProvider="{Binding CredentialsProvider}">
</msmap:Map>
Set your Bing Maps API key
To use the map you’ll need to get a key, which is free from Microsoft. Without a key, you will be stuck with the message Invalid Credentials Sign up for a developer account.
The API key is a single string, much like you may be familiar with if you have used the Google Maps API. The Map control makes it a little harder though and expects an object of the CredentialsProvider class. It’s easy enough to create a property in your .cs file that exposes a property of type CredentialsProvider and then bind that property to the map property.
private readonly CredentialsProvider _credentialsProvider = new ApplicationIdCredentialsProvider("Your Key");
public CredentialsProvider CredentialsProvider
{
get { return _credentialsProvider; }
}
Adding a pushpin to the map
The first thing you will want to do with your newly acquired map is to zoom to a certain location and display a pushpin. Thankfully there are a few ways to do this. The first is to programmatically add a pushpin to the map in your .cs file and zoom in.
The bare-bones approach to add a pushpin directly to the Map in your code is shown below.
Pushpin p = new Pushpin();
p.Location = new System.Device.Location.GeoCoordinate(51.42153, -0.20786);

//add the pushpin to the map
routeMap.Children.Add(p);
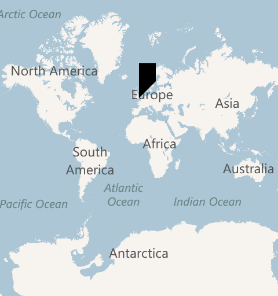
Compile and run the app and you will get a single pushpin, as shown below.
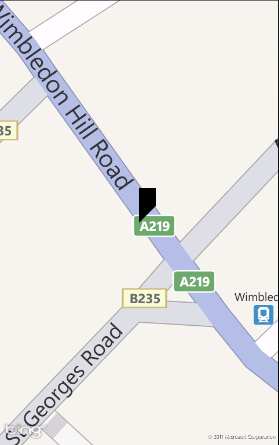
Just as you can add the pushpin in code-behind, you can also programmatically zoom the map to the chosen location, by setting the map’s Center and ZoomLevel properties. Set the zoom to an appropriate number between 1 and 19, where 19 is very close.
//set the center of the map and the zoom level
routeMap.Center = new System.Device.Location.GeoCoordinate(51.42153, -0.20786);
routeMap.ZoomLevel = 19;
Augmented Reality#2: Is that picture level?
A while ago I wrote a post about creating a simple spirit-level using the Accelerometer in Windows Phone 7. In the Mango release a number of things have changed with the way the Accelerometer API is accessed and how its’ results are returned. There has also been one huge new feature released in Mango that takes the simple spirit-level app to a whole new level. Of course I am speaking about the VideoBrush control, which enables access to the live video feed from the device.
As I pondered potential uses of Augmented Reality, my mind drifted back to the spirit-level application and I began to think about how useful it would be to be able to stand back from an object and determine if it was level. I mean, you have to admit it is easier to stand back from your newly hung photo frame and check that it is level than to simply guess. Ok, you may be able to place your trusty spirit-level (or WP7) against a photo frame and test that it is level, but what about when you are standing in the Louvre and suddenly realise that the Mona Lisa looks a little crocked? I don’t think those burly security guards are going to let you walk up and put your phone on top of the frame.
The first thing you will notice when dealing with the Accelerometer in Mango is that there is no ReadingChanged event. According to MSDN, this has been replaced by the CurrentValueChanged event. The next thing you’ll notice is that the CurrentValueChanged event expects a SensorReadingEventArgs parameter instead of the AccelerometerReadingEventArgs parameter we utilised in our code for Windows Phone 7. In the Mango release, Microsoft have decided to standardise the way developers access the ever increasing range of sensors – including the Accelerometer, Compass, Gyroscope and Motion.
//display the video feed
PhotoCamera m_camera = new PhotoCamera();
this.videoBrush.SetSource(m_camera);
//start the Accelerometer
sensor.CurrentValueChanged +=new EventHandler<SensorReadingEventArgs<AccelerometerReading>>(sensor_CurrentValueChanged);
sensor.Start();
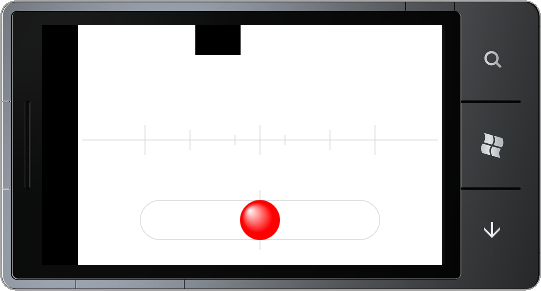
Thankfully, all of these changes result in only a handful of changes to the original Windows Phone 7.0 code. One thing the Mango 7.5 code takes advantage is, especially when dealing with 3D objects, is the XNA framework. This is evident by that fact that the EventArgs returned by the CurrentValueChanged event no longer refer to X,Y,Z, but to a XNA object called Vector3 (Microsoft.Xna.Framework.Vector3). Again, a small change to our previous code enables us to visualise in which direction the device is tilted, just like a real spirit-level.
void sensor_CurrentValueChanged(object sender, SensorReadingEventArgs<AccelerometerReading> e)
{
Dispatcher.BeginInvoke(() => MyReadingChanged(e));
}
void MyReadingChanged(SensorReadingEventArgs<AccelerometerReading> e)
{
//use the XNA Vector3 object to access X,Y,Z
Microsoft.Xna.Framework.Vector3 moved = e.SensorReading.Acceleration;
BallTransform.X = -e.SensorReading.Acceleration.Y * (Track.Width - Ball.Width);
}
Augmented Reality#1: Display The Live Video Feed
There are loads of interesting Augmented Reality (AR) apps doing the rounds on all smartphone platforms and now, Microsoft has given developers all the tools they need to build great AR apps for the Mango release of Windows Phone.
The first step in creating the next big augmented reality app is to display the live video feed. Before the Mango release, the only interaction developers had with the camera was using the CameraCaptureTask, which I covered in an earlier post. The CameraCaptureTask only lets you start the built-in camera app and wait for it to send back the results to your app.
With the new features in Mango, you can access the feed directly from the camera, with only a few lines of code. All you need to do is set the source of the VideoBrush control to the devices camera.
To start, add a Rectangle to your MainPage XAML and set it’s Fill to a VideoBrush.
<Rectangle>
    <Rectangle.Fill>
        <VideoBrush x:Name="videoBrush"/>
    </Rectangle.Fill>
</Rectangle>
In the code behind, add a using statement for Microsoft.Devices and the in either the Loaded or OnNavigatedTo method, set the source of the VideoBrush to the PhotoCamera class.
void MainPage_Loaded(object sender, RoutedEventArgs e)
{
PhotoCamera m_camera = new PhotoCamera();
this.videoBrush.SetSource(m_camera);
}
Compile and run the app in the emulator and you’ll see an exciting black square moving around on a white background. Don’t worry, on a real device you will see the actual camera feed.
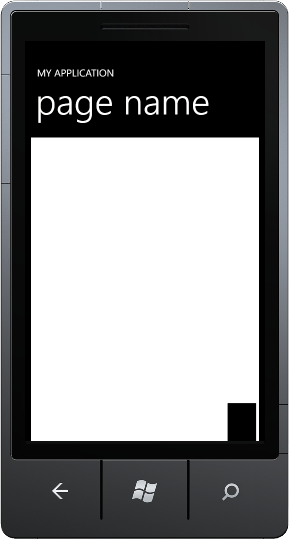
Now, if you are lucky enough to have a real Windows Phone 7 device and you have upgraded to Mango, you will find the results were less than ideal. In fact, the results were about 90 degrees off ideal! Yes that’s right, the code that everyone is flogging off as being able to display the live camera feed displays the resulting video 90 degrees off what it should be. It’s all very interesting and art-nouveau, but in terms of AR apps, it’s rubbish.
Thankfully it’s very easy to fix the problem. All you need to do is apply a transformation to the VideoBrush used to fill the Rectangle.
<Rectangle>
    <Rectangle.Fill>
        <VideoBrush x:Name="videoBrush">
            <VideoBrush.RelativeTransform>a
                <CompositeTransform CenterX="0.5" CenterY="0.5" Rotation="90" />
            </VideoBrush.RelativeTransform>
        </VideoBrush>
    </Rectangle.Fill>
</Rectangle>
This will rotate the camera feed so that what you expect to see through the viewfinder is actually what you get.
This is of course only the first step to creating a fully fledge AR application that will combine the digital and real world in ways you only dreamed of, but it is a huge step forward compared to the old CameraCaptureTask days.
This code is not only useful for augmented reality, but with a small amount of work you can use any number of the existing launcher and chooser tasks in WP7 to create apps that show that real-world camera feed behind whatever tasks you need to perform.
In the next few posts we’ll look at building a simple email and sms tool that uses the camera feed so that users can see where they are going while writing that all important email.
Adding Tap animation to the HubTile
In the previous post we looked at how you can use the HubTile control from the Windows Phone Toolkit to perform various navigation tasks.
One thing you may have noticed is that when you tap the HubTile, it doesn't move like the Live Tiles on the Windows Phone Start Screen. The easy fix for this is to add a TiltEffect, a component of the same Toolkit to the HubTile. The TiltEffect is an easy way to add that slight 'wiggle' you expect when pressing items in the ListView, so it seems like the perfect candidate.
There are a number of ways to add TiltEffect to the HubTile, but by far the easiest is to add it directly to control, such as in the example below;
<toolkit:HubTile
        toolkit:TiltEffect.IsTiltEnabled="True"
        Title="Sam"
        Message="Yosemite Sam"
        Source="/Assets/Images/Yosemite-Sam.jpg"
        Background="{StaticResource PhoneAccentBrush}"
        Tap="HubTile_Tap"/>
If you run the page and test the HubTile you'll notice that the animation does not appear to work. That's because for some reason, the HubTile is not included in the list of items that TiltEffect applies to. Thankfully, the solution is easy. In your code-behind you can manually add the HubTile to the TiltableItems list.
public MainPage()
{
    InitializeComponent();

    TiltEffect.TiltableItems.Add(typeof(HubTile));

}
Responding to Windows Phone Toolkit HubTile Events
In a previous post we looked at how to include the metro-styled HubTile to your Windows Phone app. In this post, we'll discover how to perform an action when the user taps the tile.
The HubTile contains an event named Tap, which is triggered whenever the users touches the tile. This event can be handled in your code-behind to perform a task, such as navigating to a new page in your app.
XAML
<toolkit:HubTile
        Title="Sam"
        Message="Yosemite Sam"
        Source="/Assets/Images/Yosemite-Sam.jpg"
        Background="{StaticResource PhoneAccentBrush}"
        Tap="HubTile_Tap"/>
Code Behind
private void HubTile_Tap(object sender, System.Windows.Input.GestureEventArgs e)
{
    NavigationService.Navigate(new Uri("/DatailsPage.xaml", UriKind.Relative));
}
This solution works fine if you have a single HubTile, but what about if you have more than one HubTile, which really is the point of the control in the first place?
The good news is that there are a number of way you can handle multiple HubTile on a single page. Firstly, you could create separate handlers for each Tap event, like in the example below.
XAML
<toolkit:HubTile
        Title="Sam"
        Message="Yosemite Sam"
        Source="/Assets/Images/Yosemite-Sam.jpg"
        Background="{StaticResource PhoneAccentBrush}"
        Tap="HubTile1_Tap"/>
<toolkit:HubTile
        Title="Bugs"
        Message="Bugs Bunny"
        Source="/Assets/Images/Bugs-Bunny.jpg"
        Background="{StaticResource PhoneAccentBrush}"
        Tap="HubTile2_Tap"
    Margin="12,0,0,0"/>
Code Behind
private void HubTile1_Tap(object sender, System.Windows.Input.GestureEventArgs e)
{
    NavigationService.Navigate(new Uri("/DatailsPage1.xaml", UriKind.Relative));
}

private void HubTile2_Tap(object sender, System.Windows.Input.GestureEventArgs e)
{
    NavigationService.Navigate(new Uri("/DatailsPage2.xaml", UriKind.Relative));
}
This gives you a nice separation of concerns and makes it clear exactly what is going on, but it also means there's a lot of code.
Another option is to use the single event handler, but to somehow identify the actually HubTile that was tapped. The sender object in the HubTile Tap event is the HubTile that was tapped, so it is relatively easy to cast the sender but to a HubTile and retrieve whatever values you want to uniquely identify the HubTile.
The code below shows how easy it is to retrieve the HubTile's Title value and then use it in a switch statement to perform a different action for each HubTile.
private void HubTile_Tap(object sender, System.Windows.Input.GestureEventArgs e)
{
    HubTile tile = (HubTile)sender;
    MessageBox.Show(tile.Title);

    switch(tile.Title)
    {
        case "Sam":
            NavigationService.Navigate(new Uri("DetailsPage1.xaml",UriKind.Relative));
            break;
        case "Bugs":
            NavigationService.Navigate(new Uri("DetailsPage1.xaml",UriKind.Relative));
            break;
    }
}
Using the Windows Phone Toolkit HubTile control
In the August 2011 release of the Windows Phone Toolkit a handy little control has been released that makes it easy to created rotating tiles similar to those that come on the Windows Phone start screen. In this demo, we'll cover how to add a HubTile control to your app and describe the various components of the HubTile.
First off, follow the instructions on CodePlex (http://silverlight.codeplex.com/) to install the Windows Phone Toolkit and create a new Windows Phone project in Visual Studio.
On the page where you want to use the HubTile, add an XML Namespace entry for the Toolkit.
xmlns:toolkit="clr-namespace:Microsoft.Phone.Controls;assembly=Microsoft.Phone.Controls.Toolkit"
The code to add a single HubTile to the page is as follows;
<toolkit:HubTile
    Title="Sam"
    Message="Yosemite Sam"
    Source="/Assets/Images/Yosemite-Sam.jpg"
    Background="{StaticResource PhoneAccentBrush}" />
Basic Properties
Title - Appears on both the front and flip-side of the tile (Sam)
Message - Appears at the top of the flip-side of the tile (Yosemite Sam)
Source - The image to display
Behaviour
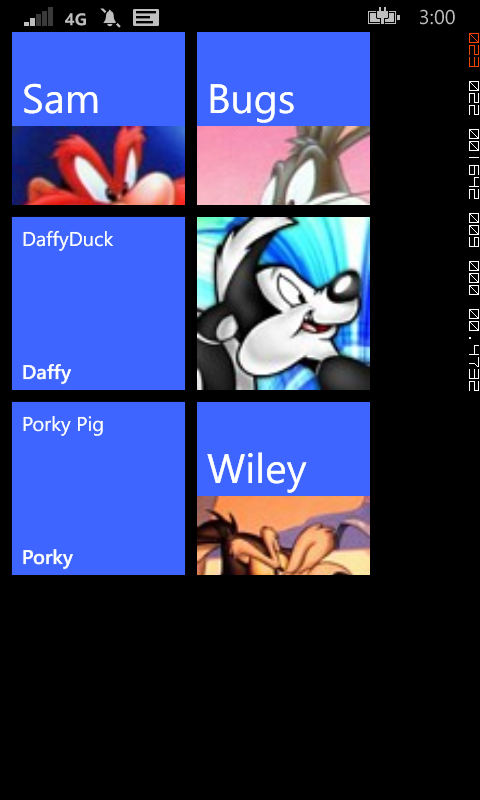
The HubTile cycles through a number of states as shown in the image below. These include displaying only the Source image, a split view of the Source and Title, the front-side view of the Title in large font and the flip-side view.

Obviously, one HubTile on it's own is not that exciting, but by wrapping a number of HubTiles in one of the XAML containers, such as a Grid or StackPanel, you'll soon be on the way to creating a Start Screen-like experience in your own app.
Getting Started with Starter Kit for Schools
Chris Koenig has just authored a nice little starter kit designed specifically for building a Windows Phone app that displays information about a school.
Once you have downloaded the latest package from github you should extract the zip file, which contains the sample project. Launch Visual Studio and open the MySchoolApp project from the C# folder. Build and run the application to check that everything compiles.
A quick read of the descriptionframe.html instructions located in the description folder is also helpful, as it lays out how to go about changing the default settings.
Most of the data is contained within the app's Data folder, so it's going to be a little painful to update, but certainly it's a good start. A more robust approach would be to create a WFC web service that would feed the relevant data. Having said that, unless your school, college or university changes every other day, the static content will probably suffice.
Adding a new set of links
The app also contains a number of collections of links that can be used to launch the browser and display some online content. Out of the box these are saved in Links.xml and Athletics.xml. It is pretty easy to add more link collections by creating and modifying a copy of these files.
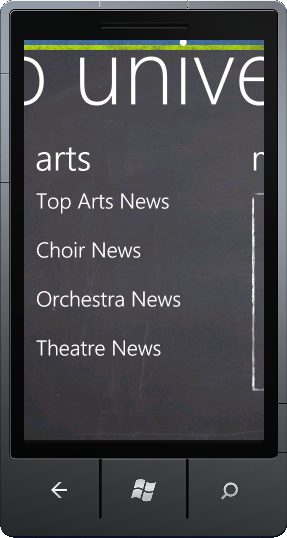
For example you could create Arts.xml to showcase the Arts and Cultural aspects of your school.
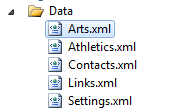
This might then contain XML such as shown below:
<links>
<link>
<url>http://contosouniversity.net</url>
<title>Top Arts News</title>
</link>
<link>
<url>http://contosouniversity.net</url>
<title>Choir News</title>
</link>
<link>
<url>http://contosouniversity.net</url>
<title>Orchestra News</title>
</link>
<link>
<url>http://contosouniversity.net</url>
<title>Theatre News</title>
</link>
</links>
Modify the ViewModel
The next step is to wire up the code so that you can use these links on the MainPage. To do this you need to make a few changes to the MainViewModel.cs file, located in the ViewModels folder.
First create a new property to expose your list of Arts related links
public ObservableCollection<Link> ArtsLinks { get; private set; }
Modify the constructor to instantiate a new instance of this property
this.ArtsLinks = new ObservableCollection<Link>();
Finally, modify the parseLinkFile method and include the code to load the links from Arts.xml.
parseLinkFile("/Data/Arts.xml").ForEach(x => ArtsLinks.Add(x));
Add a new PanoramaItem
To display the new list of Arts links, open MainPage.xaml and copy the existing athletics PanoramaItem. You can then modify this code to point to our newly created ArtsLinks.
<controls:PanoramaItem Header="arts">
    <ListBox x:Name="artsListBox"
                Margin="0,0,-12,0"
                ItemsSource="{Binding ArtsLinks}"
                ItemTemplate="{StaticResource LinkDataTemplate}"
                SelectionChanged="ListBox_SelectionChanged"/>
</controls:PanoramaItem>
Compile and run the app to see your new Arts links.
Using the Accelerometer#2 Creating a Level
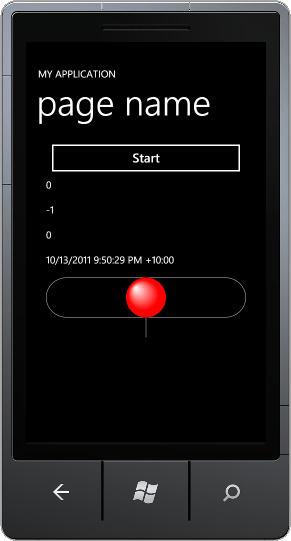
In this post we will extend upon the simple Accelerometer example I looked at in a previous post by actually graphically representing the Accelerometer data on the Windows Phone 7 device. One way to do this is to create a spirit-level – you know the thingy in your toolbox that you use to see if something is level or not!
Thanks to some XAML from Jeff Prosise's Blog we can easily add a spirit-level to the previous application and use it to track the movement of the device relative to one dimension. We add a simple rectangle and a bubble (an Ellipse) to represent how far out of level the device is.
<StackPanel Margin="0" Orientation="Vertical" VerticalAlignment="Top" Width="400">
    <Button Click="Button_Click" Height="78" Content="Start" />
    <TextBlock x:Name="TextBlockX" Height="50" TextWrapping="Wrap" Text="TextBlock"/>
    <TextBlock x:Name="TextBlockY" Height="50" TextWrapping="Wrap" Text="TextBlock"/>
    <TextBlock x:Name="TextBlockZ" Height="50" TextWrapping="Wrap" Text="TextBlock"/>
    <TextBlock x:Name="TextBlockTimeStamp" Height="50" TextWrapping="Wrap" Text="TextBlock"/>
    <Canvas>
        <Rectangle x:Name="Track"
                   Width="400"
                   Height="80"
                   Stroke="#FFC0C0C0"
                   RadiusX="40"
                   RadiusY="40" />
        <Line Stroke="#FFC0C0C0"
                X1="0" Y1="0" X2="0" Y2="120"
                HorizontalAlignment="Center"
                VerticalAlignment="Center"
                Margin="200,0,0,0" />
        <Ellipse x:Name="Ball" Width="80" Height="80" Margin="160,0,0,0">
            <Ellipse.Fill>
                <RadialGradientBrush GradientOrigin="0.234,0.255">
                    <GradientStop Color="White"/>
                    <GradientStop Color="Red" Offset="0.759"/>
                </RadialGradientBrush>
            </Ellipse.Fill>
            <Ellipse.RenderTransform>
                <TranslateTransform x:Name="BallTransform" />
            </Ellipse.RenderTransform>
        </Ellipse>
    </Canvas>
</StackPanel>
The Rectangle acts as a visual guide helping us understand which way the bubble needs to move before the device is level.
Most real spirit-levels only show the tilt in one dimension at a time, so we’ll only be looking at moving the bubble along the X axis in the example. It is also important to note that the bubble in a spirit-level moves in the opposite direction to the current tilt of the device, so we need to move our Ellipse in a negative X direction.
To graphically display the movement of the device we will use a TranslateTransform transformation named BallTransform to move the bubble to the left or right. This transformation can then be called from the code we created to handle the ReadingChanged event in the previous post.
void MyReadingChanged(AccelerometerReadingEventArgs e)
{
TextBlockX.Text = e.X.ToString();
TextBlockY.Text = e.Y.ToString();
TextBlockZ.Text = e.Z.ToString();
TextBlockTimeStamp.Text = e.Timestamp.ToString();
//New code to move the ball from left to right
BallTransform.X = -e.X * (Track.Width - Ball.Width);
}
Running the app on a WP7 device will display a red ball that moves in the opposite direction to the current tilt of the device, enabling you to find the true level of any object you lay the device on. This may be handy if you need to show the boss that your desk really does lean to the right!
