Using the Accelerometer
The Accelerometer is part of the Sensors API, so to you will need to add a reference to Microsoft.Devices.Sensors. You will also want to add a using statement on the pages where you will be using the Accelerometer.
using Microsoft.Devices.Sensors;
Starting the Accelerometer and accessing its values is as simple as many of the other API calls you’ll make in developing a Windows Phone 7 application. In the code behind you declare a local variable of type Accelerometer and call its Start() method.
//declare a local variable
Accelerometer sensor;
private void Button_Click(object sender, RoutedEventArgs e)
{
sensor = new Accelerometer();
sensor.ReadingChanged += new EventHandler<AccelerometerReadingEventArgs>(sensor_ReadingChanged);
sensor.Start();
}
As with most calls to the device API’s, you will need to handle an event whenever the Accelerometer reading changes. As you can see in the code above, we are handling the ReadingChanged event which includes a parameter of class AccelerometerReadingEventArgs. AccelerometerReadingEventArgs contains a number of fields you will need to use in deciding which way the device has been moved, including the X,Y,X and a Timestamp value.
Whenever the readings from Accelerometer change, sensor_ReadingChanged is called, which invokes a background thread to handle the change of values.
void sensor_ReadingChanged(object sender, AccelerometerReadingEventArgs e)
{
//e contains X,Y,Z readings and a timestamp
Dispatcher.BeginInvoke(() => MyReadingChanged(e));
}
void MyReadingChanged(AccelerometerReadingEventArgs e)
{
TextBlockX.Text = e.X.ToString();
TextBlockY.Text = e.Y.ToString();
TextBlockZ.Text = e.Z.ToString();
TextBlockTimeStamp.Text = e.Timestamp.ToString();
}
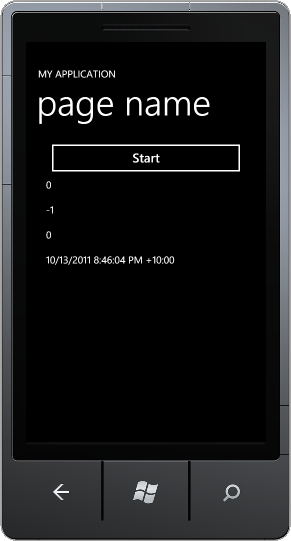
Running this code will result in the values for X,Y,X and the Timestamp being displayed on the screen in their respective TextBlocks. The emulator can't move, so you will find the results somewhat boring. Running the app on a WP7 device however is a different story. Even when you place the device on a flat surface you will notice that the readings continually change, often many times per second. In a future post we will look at how you can smooth out these readings to obtain information about the general direction of movement.
Sending an SMS from Window Phone 7 App
In a previous post I covered how to send emails to one of your contacts directly from a Windows Phone 7 application. WP7 enables you to support a number of other communication channels, including SMS, right inside your application.
private void Button_Click(object sender, RoutedEventArgs e)
{
SmsComposeTask sms = new SmsComposeTask();
sms.To = "555 1234";
sms.Body = "Wow sending an sms from WP7 is so easy";
sms.Show();
}
While it is possible to send an SMS message directly to a mobile number (as shown in the code above), it would normally be preferable to allow the user to select one of their contacts before sending the message.
private void Button_Click(object sender, RoutedEventArgs e)
{
PhoneNumberChooserTask phone = new PhoneNumberChooserTask();
phone.Completed += new EventHandler<PhoneNumberResult>(phone_Completed);
phone.Show();
}
void phone_Completed(object sender, PhoneNumberResult e)
{
//only continue if the user selected a contact
if (e.TaskResult == TaskResult.OK)
{
SmsComposeTask sms = new SmsComposeTask();
sms.To = e.PhoneNumber;
sms.Body = "Wow sending an sms from WP7 is so easy";
sms.Show();
}
}
The SMSComposeTask launches the messaging application on the OS and displays the new message. As with all the other Launcher tasks we have investigated, the user has the option to edit the message or even cancel sending it altogether.
Stirling Database for Windows Phone 7
When I first started developing Windows Phone 7 apps I used the tried and tested approach to saving data using serialization into XML. This worked fine for apps that only required a small amount of data or for saving application settings, but I soon realised that when storing and retrieving large amounts of data I would need something a little better.
A little research pointed me towards the Stirling Isolated Storage Database. To test out the capabilities I decided to modify a small app I had created that was currently using XML serialization before diving in and updating some of the more complex apps I had in development.
About the App
The app I chose to upgrade was an Issue Tracking and Lodgement application designed to allow inspectors to record and lodge issues, such as vandelism and asset damage via a webservice into the corporate asset management system. Each issue is stored locally as well as being uploaded via the webservice and as the number of these issues grows, the amount of data being strored and retrieved can become significant.
The app consists of a number of data capture pages where an inspector can take photos and record the details of the issue. There is a simple IssueModel class that is used to define the data captured, including a unique Guid ID.
public Guid ID { get; set; }

public string Problem { get; set; }

public string AssetType { get; set; }

public string Cause { get; set; }

public string Remedy { get; set; }

public Double Latitude { get; set; }

public Double Longitude { get; set; }
Getting Started
Open your Windows Phone 7 project and Add a reference to Wintellect.Sterling.WindowsPhone – this library will be created when you build the sample solution downloaded from Codeplex.
So you can access the database from whereever you need it in your app, add the following using statement and variables for the DatabaseEngine, Logger and Instance.
using Wintellect.Sterling;
...
private static ISterlingDatabaseInstance _database = null;
private static SterlingEngine _engine = null;
private static SterlingDefaultLogger _logger = null;
Create a property in your App.xaml.cs with a return value of ISterlingDatabaseInstance that will be used to gain access to your database within your app.
public static ISterlingDatabaseInstance Database
{
    get
    {
        return _database;
    }
}
Add a new class to your project and make it derive from BaseDatabaseInstance. This class is used to define your table definitions, triggers and other database elements. The bulk of the work in this class is done in the _RegisterTables() function. This is where you define your tables, based on the Objects or Models you are using in your app - in our example we have one Model named IssueModel.
public class IssuesDatabase : BaseDatabaseInstance
{
    public override string Name
    {
        get { return "IssuesDatabase"; }
    }

    protected override System.Collections.Generic.List<ITableDefinition> _RegisterTables()
    {
        return new System.Collections.Generic.List<ITableDefinition>
        {
            CreateTableDefinition<IssueModel,Guid>(i=>i.ID)
        };
    }
}
Back in the App.xaml.cs file you will also need to create a couple of functions that activate and deactivate the database engine. These are the _ActivateEngine() and _DeactivateEngine() in the App.xaml.cs file found in the sample Windows Phone 7 project you downloaded from Codeplex. I have modified these for our example - you will notice in the _ActivateEngine code that we are registering a database called IssuesDatabase that we created in the previous step.
private void _ActivateEngine()
{
    _engine = new SterlingEngine();
    _logger = new SterlingDefaultLogger(SterlingLogLevel.Information);
    _engine.Activate();
    _database = _engine.SterlingDatabase.RegisterDatabase<IssuesDatabase>();
}

private void _DeactivateEngine()
{
    _logger.Detach();
    _engine.Dispose();
    _database = null;
    _engine = null;
}
Saving Records
The next step is to modify your method of saving data. Thankfully I had created a helper class to load and save IssueModel objects, so I was able to modify the existing functions very easily. The original Save function shown below serialized a List<IssueModel> object into a file called Issues.xml that was saved in Isolated Storage.
public void Save(List<IssueModel> items)
{
    using (IsolatedStorageFile isf =
        IsolatedStorageFile.GetUserStoreForApplication())
    {
        using (IsolatedStorageFileStream stream = isf.OpenFile("Issues.xml", System.IO.FileMode.Create))
        {
            StreamWriter writer = new StreamWriter(stream);
            XmlSerializer xs = new XmlSerializer(typeof(List<IssueModel>));
            xs.Serialize(writer, items);
            writer.Close();
        }
    }
}
We no longer need to load and save the entire set of data, so we can modify the the function to save a single IssueModel object. Obviously if you still want to save a list of objects you can use a foreach loop to step through the List and save each item.
public static void Save(IssueModel item)
{
    App.Database.Save<IssueModel>(item);
    App.Database.Flush();
}
Loading Records
Modifying the Load function was only slightly more complex. The original Load function deserialized an XML file named Issues.xml that was saved in Isolated Storage and returned a List<T> object.
public static List<IssueModel> Load()
{
    List<IssueModel> _items = new List<IssueModel>();

    using (IsolatedStorageFile isf =
        IsolatedStorageFile.GetUserStoreForApplication())
    {
        using (IsolatedStorageFileStream stream = isf.OpenFile("Issues.xml", System.IO.FileMode.OpenOrCreate))
        {
            if (stream.Length > 0)
            {
                StreamReader reader = new StreamReader(stream);
                XmlSerializer xs = new XmlSerializer(typeof(List<IssueModel>));
                _items = (List<IssueModel>)xs.Deserialize(reader);
                reader.Close();
            }
        }
    }

    if (_items==null)
        return new List<IssueModel>();
    else
        return _items;
}
It is still appropriate in this example to return a List<T> object, however we have to load this List with data from the database using the Stirling Query commands.
public static List<IssueModel> Load()
{
    List<IssueModel> _items = new List<IssueModel>();

    //load all IssueModel objects from the Database
    foreach (var item in App.Database.Query<IssueModel, Guid>())
    {
        _items.Add(item.LazyValue.Value);
    }

    return _items;
}
Conclusion
By modifying the helper class that is used to Load and Save our Model, we have been able to implement the Stirling Isolated Storage Database without significant disruption to our Views. By including the Database property in out App.xaml.cs file we can now have access to the database from any class within our project. The next step is to utilise Stirling's support of LINQ to develop other functions that return filtered lists of objects - but that is left for another day.