Add contents of a stream to a Zip file
In a recent project I needed to create a Zip file containing a number of files and a summary of the contents. Thanks to the .NET 4.5 ZipArcive class, this was relatively straigh forward.
One hurdle that needed to be overcome was adding the a text file to the Zip that contained a list of the files that had been Zipped along with some other information about each record. I started by creating a StreamWriter, using a MemoryStream as I didn't actually want to save the file to disk.
Lines containiing the file details would be written to the StreamWriter as each record was processed, then at the end of the process, the MemoryStream would be saved to the ZipArchive.
// create and save zip file
using (var outStream = new MemoryStream())
{
using (var archive = new ZipArchive(outStream, ZipArchiveMode.Create, true))
{
MemoryStream ms = new MemoryStream();
var csv = new StreamWriter(ms);
// call some process on each record sent into the function
foreach (var graphic in Request.Items)
{
// write results to stream
csv.WriteLine(...);
}
// add results to the zip
var csvCompressed = archive.CreateEntry(Request.Record.BatchName + ".txt");
using (var csvStream = csvCompressed.Open())
{
csv.Flush(); // write content to memory stream
ms.Seek(0, SeekOrigin.Begin);
ms.CopyTo(csvStream); // save memory stream to Zip
}
}
// save the zip file
using (var fileStream = new FileStream(fullPath, FileMode.Create))
{
outStream.Seek(0, SeekOrigin.Begin);
outStream.CopyTo(fileStream);
}
}
Get deals for games with the CheapShark API
CheapShark provides a list of deals for games from many of the big suppliers, like Amazon. As part of the service, CheapShark provides an API that allows you to search for deals for a specific game.
In this post, we’ll look at how you can use the CheapShark API to build a Windows Phone 8 “Best-Price” app for games.
Creating our Visual Studio solution
Add a two new folders to the project, one named Models and the other ViewModels. Using nuget, either via the ‘Manage Packages’ context menu, or using the console, add the Microsoft HTTP Client Libraries and the Json.NET packages. These will help us call the web service and then convert the resulting Json.
Querying the CheapShark service
The Url for the CheapShark API is as follows:
http://www.cheapshark.com/api/1.0/games?title=[Search Term]
Using Json2CSharp, copy and paste the Json formatted results from a call to the above Url into the textbox, hit Generate get to resulting C# class. Add this into the Models folder as class named Result.
public class Result
{
    public string gameID { get; set; }
    public string steamAppID { get; set; }
    public string cheapest { get; set; }
    public string cheapestDealID { get; set; }
    public string external { get; set; }
    public string thumb { get; set; }
}
The MainViewModel contains an ObservableCollection of Result objects and a single asynchronous call to the CheapShark web service.
public class MainViewModel : NotifyBase
{
    string baseUrl = "http://www.cheapshark.com/api/1.0/";

    public MainViewModel()
    {
    }

    private ObservableCollection<Result> _Results;
    public ObservableCollection<Result> Results
    {
        get { return _Results; }
        set
        {
            _Results = value;
            OnPropertyChanged("Results");
        }
    }

    public async Task LoadDataAsync(string Title)
    {
        Uri uri = new Uri(string.Format("{0}games?title={1}", baseUrl, Title));

        await FetchDataAsync(uri);
    }

    private async Task FetchDataAsync(Uri uri)
    {

        HttpClient client = new HttpClient();
        try
        {
            var response = await client.GetStringAsync(uri);

            var results = JsonConvert.DeserializeObject<List<Result>>(response);
            this.Results = new ObservableCollection<Result>(results);
        }
        catch (System.Net.WebException exception)
        {
            string responseText;

            using (var reader = new System.IO.StreamReader(exception.Response.GetResponseStream()))
            {
                responseText = reader.ReadToEnd();
                throw new Exception(responseText);
            }
        }
    }
}
Creating the Windows Phone project
With the basics methods and properties in our PCL, it’s time to add a new Windows Phone App (found in the C#/Store Apps category in Visual Studio).
Add a reference to the CheapShark.PCL project so that we can use our MainViewModel and the nuget package for the Windows Phone Toolkit (just in case!).
Create an application property that exposes our MainViewModel, so that it can be referenced throughout the app. In the App.xaml.cs file add the following code.
private static MainViewModel _ViewModel;
public static MainViewModel ViewModel
{
    get
    {
        if(_ViewModel==null)
            _ViewModel = new MainViewModel();
        return _ViewModel;
    }
    set { _ViewModel = value; }
}
Calling the ViewModel from the MainPage
We’ll override the OnNavigatedTo event to link the MainPage with the MainViewModel. This ensure that the ViewModel is available whenever the page gets called. In the MainPage.cs file add the following code.
protected async override void OnNavigatedTo(NavigationEventArgs e)
{
    this.DataContext = App.ViewModel;

    await App.ViewModel.LoadDataAsync("Batman");

    base.OnNavigatedTo(e);
}
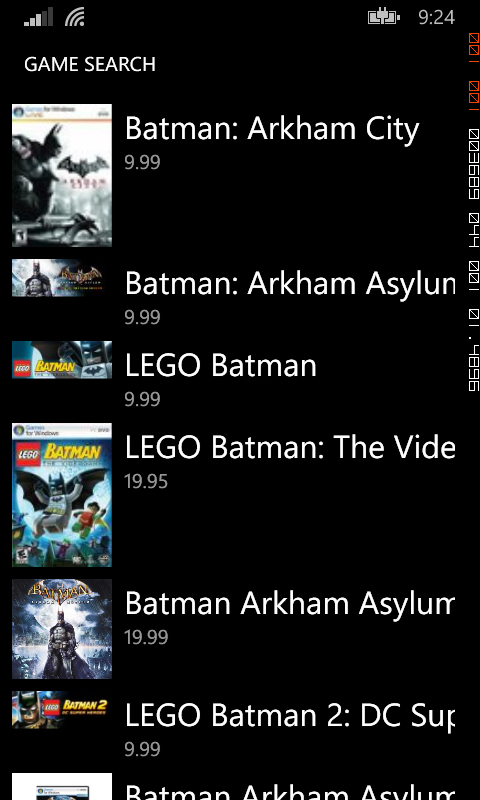
To start with, we’re going to hard code the search term we’re interested in, to confirm that everything is wired up correctly.
Now that we’ve linked the ViewModel, it’s time to add the XAML that will display the results. Once again we'll use our derived LongListSelector control, so add a new xmlns named local to your MainPage.xaml as follows:
xmlns:local="clr-namespace:GameSearch.WP"
Inside the ContentPanel Grid control, add the following mark-up:
<local:LongListSelector ItemsSource="{Binding Results}">
    <local:LongListSelector.ItemTemplate>
        <DataTemplate>
            <StackPanel Orientation="Horizontal" Margin="0,0,0,12" >
                <Image Source="{Binding thumb}"
                       Width="100"
                       VerticalAlignment="Top"
                       HorizontalAlignment="Left"/>
                <StackPanel Margin="12,0,0,0" VerticalAlignment="Top" >
                    <TextBlock Text="{Binding external}"
                                HorizontalAlignment="Left"
                                VerticalAlignment="Top"
                                FontSize="{StaticResource PhoneFontSizeLarge}" />
                    <TextBlock Text="{Binding cheapest}"
                                HorizontalAlignment="Left"
                                Style="{StaticResource PhoneTextSubtleStyle}"
                                Margin="0,0,12,0" />
                </StackPanel>
            </StackPanel>
        </DataTemplate>
    </local:LongListSelector.ItemTemplate>
</local:LongListSelector>
Run the app on your device and test out the results – you should get a list of results that match your search term.
GoodReads API
GoodReads provides a way to discover books you might like based on your reading habits. You can create digital bookshelves containing books you have read or want to read. You can also search for books by title, which is the API function we’re going to tacking in today’s API August post.
Sigining up for a GoodReads API Key
Like the Google APIs, you need to sign up for an API key. Head to the api page for more information.
Creating our Visual Studio solution
Start by creating a new Class Library (Portable) project. Name the project GoodReads.PCL and the solution GoodReads.
Add a two new folders to the project, one named Models and the other ViewModels. Using nuget, either via the ‘Manage Packages’ context menu, or using the console, add the Microsoft HTTP Client Libraries.
Querying the GoodReads service
The Url for the GoodReads API is as follows:
http://www.goodreads.com/search/search?format=xml&key=[Your Key]&q=[Query]
Unlike the Google Places API, GoodReads returns XML formatted results, so there are a couple of ways to create the C# classes to use for serialization. One option is to use the Paste XML as Class option from the Edit/Paste Special menu. Another is to use the xsd.exe tool, which is what I did when first investigating the GoodReads API some time ago.
The BookListViewModel contains an ObservableCollection of GoodreadsBook results and a single asynchronous call to the GoodReads web service.
public class BookListViewModel : NotifyBase
{
    string key = "[YourAPIKey]";
    string baseUrl = "http://www.goodreads.com/search/search?";

    public BookListViewModel()
    {
        this.Books = new ObservableCollection<GoodreadsBook>();
    }
    private ObservableCollection<GoodreadsBook> _books { get; set; }

    public ObservableCollection<GoodreadsBook> Books
    {
        get { return _books; }
        set
        {
            _books = value;
            OnPropertyChanged("Books");
        }
    }

    public async Task LoadDataAsync(string Search)
    {
        try
        {
            Uri uri = new Uri(string.Format("{0}format=xml&key={1}&q={2}", baseUrl, key, Search));

            HttpClient client = new HttpClient();
            var response = await client.GetStringAsync(uri);

            StringReader sr = new StringReader(response);

            XmlSerializer xs = new XmlSerializer(typeof(GoodreadsResponse));
            GoodreadsResponse results = (GoodreadsResponse)xs.Deserialize(sr);

            // add each book from the works array
            for (int i = 0; i < results.Search.Results.Works.Length; i++)
            {
                this.Books.Add(results.Search.Results.Works[i].Books[0]);
            }
        }
        catch (Exception ex)
        {
            Debug.WriteLine(ex.Message);
        }
    }
}
Creating the Windows Phone project
Add a new Windows Phone project to your solutions (it’s in the C#/Store Apps category in Visual Studio).
Add a reference to the GoodReads.PCL project so that we can use our ViewModel.
Create an application property that exposes our MainView model, so that it can be referenced throughout the app. In the App.xaml.cs file add the following code.
private static BookListViewModel _viewModel { get; set; }
public static BookListViewModel ViewModel
{
    get
    {
        if (_viewModel == null)
            _viewModel = new BookListViewModel();
        return _viewModel;
    }
}
Calling the ViewModel from the MainPage
We’ll override the OnNavigatedTo event to link the MainPage with the BookListViewModel. This ensure that the ViewModel is available whenever the page gets called. In the MainPage.cs file add the following code.
protected override void OnNavigatedTo(System.Windows.Navigation.NavigationEventArgs e)
{
    this.DataContext = App.ViewModel;
    base.OnNavigatedTo(e);
}
We’re using a simple textbox to collect the value to add to the search query so that users can enter the name of a book to search for. We’ve wired up the OnKeyDown event so that when the user taps the ‘enter’ key on the keyboard, the search is started.
private async void OnKeyDown(object sender, KeyEventArgs e)
{
    if (e.Key == Key.Enter)
    {
        _searchTerm = SearchTextBox.Text.Trim();

        if (String.IsNullOrEmpty(_searchTerm))
            return;
        this.Focus();

        // search the API
        await App.ViewModel.LoadDataAsync(_searchTerm);

    }
}
Now that we’ve linked the ViewModel, it’s time to add the XAML that will display the results. As before, we're using our derived LongListSelector control, so add a new xmlns named local to your MainPage.xaml as follows:
xmlns:local="clr-namespace:GoodReads.WP"
Replace the LayoutRoot Grid with the following mark-up:
<!--LayoutRoot is the root grid where all page content is placed-->
<Grid x:Name="LayoutRoot" Background="Transparent">
    <Grid.RowDefinitions>
        <RowDefinition Height="Auto"/>
        <RowDefinition Height="*"/>
    </Grid.RowDefinitions>

    <StackPanel Grid.Row="0" Margin="12,17,0,12" >
        <TextBox x:Name="SearchTextBox"
                    InputScope="Search"
                    KeyDown="OnKeyDown"/>
    </StackPanel>

    <!--ContentPanel - place additional content here-->
    <Grid x:Name="ContentPanel" Grid.Row="1" Margin="12,0,12,0">
        <local:LongListSelector x:Name="lstResults"
                ItemsSource="{Binding Books}"
                ItemTemplate="{StaticResource BookItemTemplate}" />
    </Grid>
</Grid>
One change you'll notice is that we're using a resource called BookItemTemplate rather than simply adding the markup to the ItemTemplate tag as we did in the Google Places API post. This maks it much cleaner to read the markup and also enables reuse of your resources, if you make them application wide. In this case, the resource has been added at the page level, rather than application, so you'll need to add the following to your page XAML.
<phone:PhoneApplicationPage.Resources>
    <DataTemplate x:Key="BookItemTemplate">
        <StackPanel Margin="12,12,0,12" Orientation="Horizontal">
            <Image Source="{Binding ThumbnailURL}"/>
            <StackPanel Margin="12,0,0,0">
                <TextBlock HorizontalAlignment="Left"
                            Height="Auto"
                            TextWrapping="Wrap"
                            Text="{Binding Title}"
                            VerticalAlignment="Top"
                            Width="Auto"
                            Style="{StaticResource PhoneTextAccentStyle}"
                            Margin="0,0,0,0"/>
                <TextBlock HorizontalAlignment="Left"
                            Height="Auto"
                            TextWrapping="Wrap"
                            Text="{Binding Author.Name}"
                            VerticalAlignment="Top"
                            Width="Auto"
                            Margin="0,0,0,0"/>
            </StackPanel>
        </StackPanel>
    </DataTemplate>
</phone:PhoneApplicationPage.Resources>
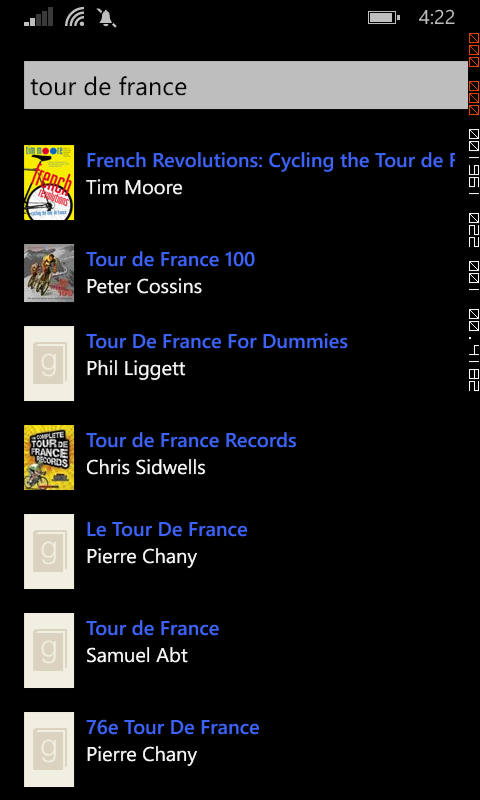
Run the app on your device and perform a search for your favourite book. You should end up with a list of results that match your search term.
Google Places API - Part 1
Apps that help you find restaurants, bars, cinemas and other businesses are extremely popular. Apps like Yelp are bringing local search and reviews to the fore, with many people relying on these services to help them decide where to spend their hard-earned money.
Many of the big names, such as Google, also provide services that can be used to create your very own place-finding app. In this post, we’ll look at how you can user Google Places API to build a Windows Phone 8 ‘What’s near me’ app.
Signing up for the Google Places API
The first step is to sign up for the Google Places API. To do that, you’ll need a Google account and access to the API Console. Check out this page for more information about how to add access to the Place API to your account.
Once you’ve added the Places API to your account, you’ll need the take a note of the API key associated with that account to make any requests to the web service.
Creating our Visual Studio solution
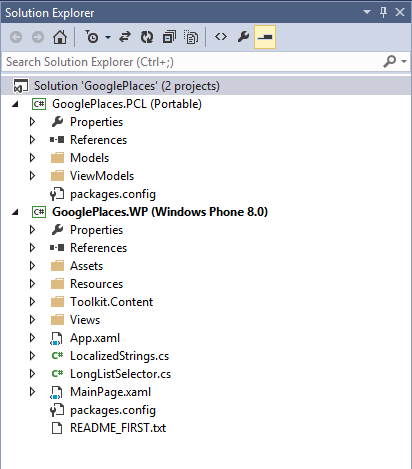
Okay, so now that we have our API key, it’s time to fire up Visual Studio. Start by creating a new Class Library (Portable) project. Name the project GooglPlaces.PCL and the solution GooglePlaces.
Add two new folders to the project, one named Models and the other ViewModels. Using nuget, either via the ‘Manage Packages’ context menu, or using the console, add the Microsoft HTTP Client Libraries and the Json.NET packages. These will help us call the web service and then handle the resulting Json.
Performing a location based search
The Url for performing a basic Places search if as follows:
https://maps.googleapis.com/maps/api/place/nearbysearch/json?location=[Latitude],[Longitude]&radius=500&key=[Your API Key]
One handy tool you can use when dealing with API’s that return Json, is found at Json2CSharp. Copy and paste the Json formatted results from a call to the above Url into the textbox, hit Generate and a bunch of C# classes will be displayed. These classes have been added to the Models folder of our project. For readability, each class was added to its’ own .cs file, however you could simply add them as a single file also.
The MainViewModel contains an ObservableCollection of results and a couple of asynchronous methods that call the Places API. This will be enough to get us started with creating a Windows Phone app and displaying a list of results.
In our app we’ll be retrieving the Latitude and Longitude from the device, so these will need to be variables we send to the web service. We’ll use a hard coded radius and create a class variable to hold the API Key.
public class MainViewModel : NotifyBase
{
    string baseUrl = "https://maps.googleapis.com/maps/api/place/nearbysearch";
    string apiKey = "[Your API Key]";

    private ObservableCollection<Result> _Results;
    public ObservableCollection<Result> Results
    {
        get { return _Results; }
        set
        {
            _Results = value;
            OnPropertyChanged("Results");
        }
    }

    public async Task LoadDataAsync(double Lat, double Long)
    {
        // convert the lat and long to a string
        string LatLong = string.Format("{0},{1}", Lat.ToString("0.0000"), Long.ToString("0.0000"));

        // build the NearbySearch Uri
        Uri uri = new Uri(string.Format("{0}/json?location={1}&radius=500&key={2}", baseUrl, LatLong, apiKey));

        // await the call to the API
        await FetchDataAsync(uri);
    }

    private async Task FetchDataAsync(Uri uri)
    {
        HttpClient client = new HttpClient();
        var response = await client.GetStringAsync(uri);

        var results = JsonConvert.DeserializeObject<ListRootObject>(response);
        this.Results = new ObservableCollection<Result>(results.results);
    }
}
Creating the Windows Phone project
With the basic methods and properties in our PCL, it’s time to add a new Windows Phone App (found in the C#/Store Apps category in Visual Studio).
Add a reference to the GooglePlaces.PCL project.
Create an application property that exposes our MainView model, so that it can be referenced throughout the app. In the App.xaml.cs file add the following code.
private static MainViewModel _ViewModel;
public static MainViewModel ViewModel
{
    get
    {
        if(_ViewModel == null)
            _ViewModel = new MainViewModel();
        return _ViewModel;
    }
    set
    {
        _ViewModel = value;
    }

}
Calling the ViewModel from the MainPage
We’ll override the OnNavigatedTo event to link the MainPage with the MainViewModel. This ensures that the ViewModel is available whenever the page gets called. In the MainPage.cs file add the following code.
protected async override void OnNavigatedTo(NavigationEventArgs e)
{
    this.DataContext = App.ViewModel;

    await App.ViewModel.LoadDataAsync(37.422, -122.083);

    base.OnNavigatedTo(e);
}
In this post just hard coding the latitude and longitude, to confirm that everything is wired up correctly. In a future post, we'll modify the code from How to get the phone's current location for Windows Phone 8 to get the actual location from the device.
Displaying the results
Now that we’ve linked the ViewModel, it’s time to add the XAML that will display the results.
Add a new xmlns named local to your MainPage.xaml as follows:
xmlns:local="clr-namespace:GooglePlaces.WP"
Inside the ContentPanel Grid control, add the following mark-up:
<local:LongListSelector ItemsSource="{Binding Results}">
    <local:LongListSelector.ItemTemplate>
        <DataTemplate>
            <StackPanel Orientation="Horizontal" Margin="12,0,0,17" >
                <Image Source="{Binding icon}"
                        Height="48" Width="48"
                        VerticalAlignment="Top"
                        Margin="0,0,8,0"/>
                <StackPanel Margin="12,0,0,17"
                            Width="432"
                            VerticalAlignment="Top" >
                    <TextBlock Text="{Binding name}"
                                HorizontalAlignment="Left"
                                VerticalAlignment="Top"
                                FontSize="{StaticResource PhoneFontSizeLarge}"
                                FontFamily="{StaticResource PhoneFontFamilyNormal}" />
                    <TextBlock Text="{Binding vicinity}"
                                HorizontalAlignment="Left"
                                Style="{StaticResource PhoneTextSubtleStyle}" />
                </StackPanel>
            </StackPanel>
        </DataTemplate>
    </local:LongListSelector.ItemTemplate>
</local:LongListSelector>
Run the app on your device and test out the results – you should get a list of places in the vicinity of the Lat/Long you hard-coded.
API August
Welcome to API August, where we’ll be looking at how to build simple Windows Phone 8 apps using some of the more common, freely accessible API’s and web services.
All of the projects we’ll be building during API August will use an MVVM pattern, so that all of the heavy lifting is carried out by a Portable Class Library (PCL). We’ll use a Windows Phone 8 project to test the PCL functionality, however, if you’re keen to develop cross-platform, there’s nothing to stop you using the PCL in a Xamarin Studio solution and creating iOS or Android app as well.
As we’ll be focussing on how to call these APIs and return the results to the user, we’ll be keeping the UI very simple. Mostly we’ll just present the results as a list of records with an accompanying page to show the details of a single record. Occasionally we’ll add some searching or filtering, but we’ll leave the rest to your imagination. Having covered the basics in these posts, you’ll be able to go out and build fantastic, full-featured apps that take the world by storm. If that does happen, be sure to drop me a line, or offer me a job:)
As API August continues, we’ll update this post with links to the projects we’re creating, so take the time to bookmark this page and check back regularly.
Here's some basics that will apply across all of the solutions we'll cover in API August.
Solution Layout
Most of our sample solutions will follow a similar pattern. We’ll have an solution with two projects SolutionName.PCL – the portable class library and SolutionName.WP – the Windows Phone 8 app.
Views - ViewModels
Since our Views need to know whenever the underlying ViewModel has changed, all of our ViewModels need to implement INotifyPropertyChanged. We’ll create a single base class NotifyBase that handles the PropertyChanged events, which our ViewModes will inherit.
public class NotifyBase : INotifyPropertyChanged
{

    public event PropertyChangedEventHandler PropertyChanged;

    protected virtual void OnPropertyChanged([CallerMemberName] string propertyName = null)
    {
        PropertyChangedEventHandler handler = PropertyChanged;
        if (handler != null)
            handler(this, new PropertyChangedEventArgs(propertyName));
    }

}
LongListSelector with bindable SelectedItem
In the API August projects, we’ll use a class derived from the built-in LongListSelector to display lists of results. The derived class adds the implementation for the SelectedItem property. This is not supported in the built-in control, but is extremely handy.
public class LongListSelector : Microsoft.Phone.Controls.LongListSelector
{
    public LongListSelector()
    {
        SelectionChanged += LongListSelector_SelectionChanged;
    }

    void LongListSelector_SelectionChanged(object sender, SelectionChangedEventArgs e)
    {
        SelectedItem = base.SelectedItem;
    }

    public static readonly DependencyProperty SelectedItemProperty =
        DependencyProperty.Register(
            "SelectedItem",
            typeof(object),
            typeof(LongListSelector),
            new PropertyMetadata(null, OnSelectedItemChanged)
        );

    private static void OnSelectedItemChanged(DependencyObject d, DependencyPropertyChangedEventArgs e)
    {
        var selector = (LongListSelector)d;
        selector.SelectedItem = e.NewValue;
    }

    public new object SelectedItem
    {
        get { return GetValue(SelectedItemProperty); }
        set { SetValue(SelectedItemProperty, value); }
    }
}
Adding multiple parameters to JSON-enabled WCF service
One thing you’ll be tempted to do when you first start creating web services is to add multiple parameters to your web methods. Don’t, it will soon trip you up, especially if any of those parameters are complex types.
A better way to handle calling WCF web services that return JSON formatted results is to use Request and Response objects. Your WCF service accepts a single complex Request object that contains all the values it needs to perform its job. The results, along with any exceptions and messages are passed back to the caller in the Response object.
In this post, we’ll modify our GetPlaces method to use Request and Response objects instead of querystring parameters.
First add the following PlaceRequest and PlaceResponse classes.
Code Snippet
- public class PlaceRequest
- {
- public string Country { get; set; }
- public int MaxPopulation { get; set; }
- }
Code Snippet
- public class PlaceResponse
- {
- public bool HasError { get; set; }
- public string Status { get; set; }
- public List<Place> Results { get; set; }
- }
Then modify the GetPlace method as follows.
Code Snippet
- [OperationContract]
- [WebInvoke(Method = "POST", BodyStyle = WebMessageBodyStyle.WrappedRequest, ResponseFormat = WebMessageFormat.Json, RequestFormat = WebMessageFormat.Json)]
- public PlaceResponse GetPlaces(PlaceRequest Request)
- {
- // instantiate our response object
- PlaceResponse response = new PlaceResponse();
-
- // create a list of places
- List<Place> places = new List<Place>();
-
- places.Add(new Place {
- Name = "London",
- Country = "UK",
- Population = 7825200
- });
-
- places.Add(new Place {
- Name = "New York",
- Country = "USA",
- Population = 8175133
- });
-
- places.Add(new Place
- {
- Name = "Los Angeles",
- Country = "USA",
- Population = 3862839
- });
-
- places.Add(new Place {
- Name = "Sydney",
- Country = "Australia",
- Population = 4391674
- });
-
- var results = from p in places
- where p.Country == Request.Country && p.Population < Request.MaxPopulation
- select p;
-
- response.Results = results.ToList();
-
- // return the response
- return response;
- }
You’ll notice that we’ve changed the WebGet tag to WebInvoke. This declaration enables us to use the HTTP POST verb, instead of GET, since the calling function will be sending a complex object in the request body, not just a parameter in the URL.
To test this web service you’ll need to create a POST HTTP request. The easiest way to do this is use a tool such as Fiddler to create the request.
Add Content-Type:application/json to the request header and specify the body as such:
{"Request":{"Country":"USA", "MaxPopulation":"4000000"}}
You’ll notice the values for Country and MaxPopulation are enclosed in an object called Request. This is because the web method parameter is called Request.
If everything goes well, Fiddler will report a response that includes the following JSON.
{"HasError":false,"Results":[{"Country":"USA","Name":"Los Angeles","Population":3862839}],"Status":null}
Building a Windows Phone 7 Look-a-like
After viewing some of the fan-mail for Sahas Katta's WP7 resume, I decided to check out just how hard it would be to build a WP7/Metro inspired website. While both Sahas' and my own attempts are not exactly perfect mirrors of the Windows Phone 7 end-user experience, it was certainly an interesting experiment.
Has your boss already bought you an Android? Are you stuck with an iPhone? Do you really wish you could experience a Windows Phone without parting with your hard-earned cash?
Well here is your solution. Take a look at this Windows Phone 7 (Mango-release) inspired site .
The site is constructed using some screenshots from the WP7 emulator and the layout is true to the actual device - trust me, I have spent enough time developing for WP7 that I know these proportions off-by-heart.
Stirling Database for Windows Phone 7
When I first started developing Windows Phone 7 apps I used the tried and tested approach to saving data using serialization into XML. This worked fine for apps that only required a small amount of data or for saving application settings, but I soon realised that when storing and retrieving large amounts of data I would need something a little better.
A little research pointed me towards the Stirling Isolated Storage Database. To test out the capabilities I decided to modify a small app I had created that was currently using XML serialization before diving in and updating some of the more complex apps I had in development.
About the App
The app I chose to upgrade was an Issue Tracking and Lodgement application designed to allow inspectors to record and lodge issues, such as vandelism and asset damage via a webservice into the corporate asset management system. Each issue is stored locally as well as being uploaded via the webservice and as the number of these issues grows, the amount of data being strored and retrieved can become significant.
The app consists of a number of data capture pages where an inspector can take photos and record the details of the issue. There is a simple IssueModel class that is used to define the data captured, including a unique Guid ID.
public Guid ID { get; set; }

public string Problem { get; set; }

public string AssetType { get; set; }

public string Cause { get; set; }

public string Remedy { get; set; }

public Double Latitude { get; set; }

public Double Longitude { get; set; }
Getting Started
Open your Windows Phone 7 project and Add a reference to Wintellect.Sterling.WindowsPhone – this library will be created when you build the sample solution downloaded from Codeplex.
So you can access the database from whereever you need it in your app, add the following using statement and variables for the DatabaseEngine, Logger and Instance.
using Wintellect.Sterling;
...
private static ISterlingDatabaseInstance _database = null;
private static SterlingEngine _engine = null;
private static SterlingDefaultLogger _logger = null;
Create a property in your App.xaml.cs with a return value of ISterlingDatabaseInstance that will be used to gain access to your database within your app.
public static ISterlingDatabaseInstance Database
{
    get
    {
        return _database;
    }
}
Add a new class to your project and make it derive from BaseDatabaseInstance. This class is used to define your table definitions, triggers and other database elements. The bulk of the work in this class is done in the _RegisterTables() function. This is where you define your tables, based on the Objects or Models you are using in your app - in our example we have one Model named IssueModel.
public class IssuesDatabase : BaseDatabaseInstance
{
    public override string Name
    {
        get { return "IssuesDatabase"; }
    }

    protected override System.Collections.Generic.List<ITableDefinition> _RegisterTables()
    {
        return new System.Collections.Generic.List<ITableDefinition>
        {
            CreateTableDefinition<IssueModel,Guid>(i=>i.ID)
        };
    }
}
Back in the App.xaml.cs file you will also need to create a couple of functions that activate and deactivate the database engine. These are the _ActivateEngine() and _DeactivateEngine() in the App.xaml.cs file found in the sample Windows Phone 7 project you downloaded from Codeplex. I have modified these for our example - you will notice in the _ActivateEngine code that we are registering a database called IssuesDatabase that we created in the previous step.
private void _ActivateEngine()
{
    _engine = new SterlingEngine();
    _logger = new SterlingDefaultLogger(SterlingLogLevel.Information);
    _engine.Activate();
    _database = _engine.SterlingDatabase.RegisterDatabase<IssuesDatabase>();
}

private void _DeactivateEngine()
{
    _logger.Detach();
    _engine.Dispose();
    _database = null;
    _engine = null;
}
Saving Records
The next step is to modify your method of saving data. Thankfully I had created a helper class to load and save IssueModel objects, so I was able to modify the existing functions very easily. The original Save function shown below serialized a List<IssueModel> object into a file called Issues.xml that was saved in Isolated Storage.
public void Save(List<IssueModel> items)
{
    using (IsolatedStorageFile isf =
        IsolatedStorageFile.GetUserStoreForApplication())
    {
        using (IsolatedStorageFileStream stream = isf.OpenFile("Issues.xml", System.IO.FileMode.Create))
        {
            StreamWriter writer = new StreamWriter(stream);
            XmlSerializer xs = new XmlSerializer(typeof(List<IssueModel>));
            xs.Serialize(writer, items);
            writer.Close();
        }
    }
}
We no longer need to load and save the entire set of data, so we can modify the the function to save a single IssueModel object. Obviously if you still want to save a list of objects you can use a foreach loop to step through the List and save each item.
public static void Save(IssueModel item)
{
    App.Database.Save<IssueModel>(item);
    App.Database.Flush();
}
Loading Records
Modifying the Load function was only slightly more complex. The original Load function deserialized an XML file named Issues.xml that was saved in Isolated Storage and returned a List<T> object.
public static List<IssueModel> Load()
{
    List<IssueModel> _items = new List<IssueModel>();

    using (IsolatedStorageFile isf =
        IsolatedStorageFile.GetUserStoreForApplication())
    {
        using (IsolatedStorageFileStream stream = isf.OpenFile("Issues.xml", System.IO.FileMode.OpenOrCreate))
        {
            if (stream.Length > 0)
            {
                StreamReader reader = new StreamReader(stream);
                XmlSerializer xs = new XmlSerializer(typeof(List<IssueModel>));
                _items = (List<IssueModel>)xs.Deserialize(reader);
                reader.Close();
            }
        }
    }

    if (_items==null)
        return new List<IssueModel>();
    else
        return _items;
}
It is still appropriate in this example to return a List<T> object, however we have to load this List with data from the database using the Stirling Query commands.
public static List<IssueModel> Load()
{
    List<IssueModel> _items = new List<IssueModel>();

    //load all IssueModel objects from the Database
    foreach (var item in App.Database.Query<IssueModel, Guid>())
    {
        _items.Add(item.LazyValue.Value);
    }

    return _items;
}
Conclusion
By modifying the helper class that is used to Load and Save our Model, we have been able to implement the Stirling Isolated Storage Database without significant disruption to our Views. By including the Database property in out App.xaml.cs file we can now have access to the database from any class within our project. The next step is to utilise Stirling's support of LINQ to develop other functions that return filtered lists of objects - but that is left for another day.
Filtering XML data in a DataSet
In the post Read XML File into DataSet we demonstrated how to read every row of data from an XML document by using the ReadXml method. While reading every row of data may be suitable for a smalll set of data, there are few times when you will actually want to return every record from the XML document. There are a number of ways to filter data from an XML document, such as using XQuery which filters the data at the XML Document level. In this example however we will conduct the filtering at the DataSet level, once it has been populated from the XML Document.
To filter out only the records we want from the DataSet, we will use the DataTable.Select method, as outlined below.
//declare and load the DataSet from the XML document
DataSet ds = new DataSet();
ds.ReadXml("AppSettings.xml");
//only select the rows where the name is CurrentInstance
DataRow[] rows = ds.Tables[0].Select("name='CurrentInstance'");
//Loop thru the rows to access each row that matches
foreach (DataRow row in rows)
{
//TODO: do something with each row
}
As you can see the DataTable.Select method returns an array of DataRow objects. We are using the constructor that takes a filterExpression as an argument. In this example we are using a simple equality filterExpression - return all records where name is equal to CurrentInstance. Depending on the datatype of the columns in your DataTable you could create a valid expression using any common operators such as Like, > (greater than), < (less than) and even join multiple exressions together using AND/OR.
C# Getting Information about your Folders
Continuing on our journey converting old VBA code to C#, in this post we’ll revisit getting information about the folders/directories on a system. In .NET parlance, folders on the file system are directories, so from here on in, that’s what we’ll call them.
In the last post we looked at how to retrieve a list of drives on the system, so in this post we’ll create a Console Application to return a list of directories in a specific drive.
Ensure you have added the System.IO namespace to Program.cs.
Copy the following code into the Main method. This code will iterate through the directories under C-drive and print the directory name in the console. NOTE: any slashes '\' in the directory path need to be escaped - for exampl, we have C:\\, not C:\.
Code Snippet
- // set the root or starting directory
- DirectoryInfo dir = new DirectoryInfo("C:\\");
-
- // get all the children under the root
- DirectoryInfo[] children = dir.GetDirectories();
-
- foreach (DirectoryInfo d in children)
- {
- Console.WriteLine(d.Name);
- }
In the code above we set the starting directory to the C-drive root, but it is important to know that you can set the starting directory to any valid directory on the system, not just drives.
It is possible to continue down the system hierarchy and return the children of each of directory by calling the GetDirectories method on each. Writing a function that recursively calls GetDirectories for each subsequent DirectoryInfo object would effectively traverse the entire directory structure.