Augmented Reality#2: Is that picture level?
A while ago I wrote a post about creating a simple spirit-level using the Accelerometer in Windows Phone 7. In the Mango release a number of things have changed with the way the Accelerometer API is accessed and how its’ results are returned. There has also been one huge new feature released in Mango that takes the simple spirit-level app to a whole new level. Of course I am speaking about the VideoBrush control, which enables access to the live video feed from the device.
As I pondered potential uses of Augmented Reality, my mind drifted back to the spirit-level application and I began to think about how useful it would be to be able to stand back from an object and determine if it was level. I mean, you have to admit it is easier to stand back from your newly hung photo frame and check that it is level than to simply guess. Ok, you may be able to place your trusty spirit-level (or WP7) against a photo frame and test that it is level, but what about when you are standing in the Louvre and suddenly realise that the Mona Lisa looks a little crocked? I don’t think those burly security guards are going to let you walk up and put your phone on top of the frame.
The first thing you will notice when dealing with the Accelerometer in Mango is that there is no ReadingChanged event. According to MSDN, this has been replaced by the CurrentValueChanged event. The next thing you’ll notice is that the CurrentValueChanged event expects a SensorReadingEventArgs parameter instead of the AccelerometerReadingEventArgs parameter we utilised in our code for Windows Phone 7. In the Mango release, Microsoft have decided to standardise the way developers access the ever increasing range of sensors – including the Accelerometer, Compass, Gyroscope and Motion.
//display the video feed
PhotoCamera m_camera = new PhotoCamera();
this.videoBrush.SetSource(m_camera);
//start the Accelerometer
sensor.CurrentValueChanged +=new EventHandler<SensorReadingEventArgs<AccelerometerReading>>(sensor_CurrentValueChanged);
sensor.Start();
Thankfully, all of these changes result in only a handful of changes to the original Windows Phone 7.0 code. One thing the Mango 7.5 code takes advantage is, especially when dealing with 3D objects, is the XNA framework. This is evident by that fact that the EventArgs returned by the CurrentValueChanged event no longer refer to X,Y,Z, but to a XNA object called Vector3 (Microsoft.Xna.Framework.Vector3). Again, a small change to our previous code enables us to visualise in which direction the device is tilted, just like a real spirit-level.
void sensor_CurrentValueChanged(object sender, SensorReadingEventArgs<AccelerometerReading> e)
{
Dispatcher.BeginInvoke(() => MyReadingChanged(e));
}
void MyReadingChanged(SensorReadingEventArgs<AccelerometerReading> e)
{
//use the XNA Vector3 object to access X,Y,Z
Microsoft.Xna.Framework.Vector3 moved = e.SensorReading.Acceleration;
BallTransform.X = -e.SensorReading.Acceleration.Y * (Track.Width - Ball.Width);
}
Adding Tap animation to the HubTile
In the previous post we looked at how you can use the HubTile control from the Windows Phone Toolkit to perform various navigation tasks.
One thing you may have noticed is that when you tap the HubTile, it doesn't move like the Live Tiles on the Windows Phone Start Screen. The easy fix for this is to add a TiltEffect, a component of the same Toolkit to the HubTile. The TiltEffect is an easy way to add that slight 'wiggle' you expect when pressing items in the ListView, so it seems like the perfect candidate.
There are a number of ways to add TiltEffect to the HubTile, but by far the easiest is to add it directly to control, such as in the example below;
<toolkit:HubTile
        toolkit:TiltEffect.IsTiltEnabled="True"
        Title="Sam"
        Message="Yosemite Sam"
        Source="/Assets/Images/Yosemite-Sam.jpg"
        Background="{StaticResource PhoneAccentBrush}"
        Tap="HubTile_Tap"/>
If you run the page and test the HubTile you'll notice that the animation does not appear to work. That's because for some reason, the HubTile is not included in the list of items that TiltEffect applies to. Thankfully, the solution is easy. In your code-behind you can manually add the HubTile to the TiltableItems list.
public MainPage()
{
    InitializeComponent();

    TiltEffect.TiltableItems.Add(typeof(HubTile));

}
Responding to Windows Phone Toolkit HubTile Events
In a previous post we looked at how to include the metro-styled HubTile to your Windows Phone app. In this post, we'll discover how to perform an action when the user taps the tile.
The HubTile contains an event named Tap, which is triggered whenever the users touches the tile. This event can be handled in your code-behind to perform a task, such as navigating to a new page in your app.
XAML
<toolkit:HubTile
        Title="Sam"
        Message="Yosemite Sam"
        Source="/Assets/Images/Yosemite-Sam.jpg"
        Background="{StaticResource PhoneAccentBrush}"
        Tap="HubTile_Tap"/>
Code Behind
private void HubTile_Tap(object sender, System.Windows.Input.GestureEventArgs e)
{
    NavigationService.Navigate(new Uri("/DatailsPage.xaml", UriKind.Relative));
}
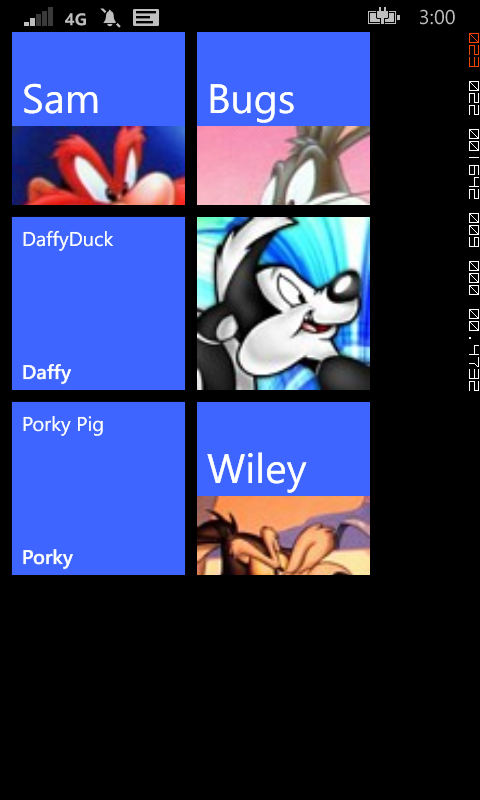
This solution works fine if you have a single HubTile, but what about if you have more than one HubTile, which really is the point of the control in the first place?
The good news is that there are a number of way you can handle multiple HubTile on a single page. Firstly, you could create separate handlers for each Tap event, like in the example below.
XAML
<toolkit:HubTile
        Title="Sam"
        Message="Yosemite Sam"
        Source="/Assets/Images/Yosemite-Sam.jpg"
        Background="{StaticResource PhoneAccentBrush}"
        Tap="HubTile1_Tap"/>
<toolkit:HubTile
        Title="Bugs"
        Message="Bugs Bunny"
        Source="/Assets/Images/Bugs-Bunny.jpg"
        Background="{StaticResource PhoneAccentBrush}"
        Tap="HubTile2_Tap"
    Margin="12,0,0,0"/>
Code Behind
private void HubTile1_Tap(object sender, System.Windows.Input.GestureEventArgs e)
{
    NavigationService.Navigate(new Uri("/DatailsPage1.xaml", UriKind.Relative));
}

private void HubTile2_Tap(object sender, System.Windows.Input.GestureEventArgs e)
{
    NavigationService.Navigate(new Uri("/DatailsPage2.xaml", UriKind.Relative));
}
This gives you a nice separation of concerns and makes it clear exactly what is going on, but it also means there's a lot of code.
Another option is to use the single event handler, but to somehow identify the actually HubTile that was tapped. The sender object in the HubTile Tap event is the HubTile that was tapped, so it is relatively easy to cast the sender but to a HubTile and retrieve whatever values you want to uniquely identify the HubTile.
The code below shows how easy it is to retrieve the HubTile's Title value and then use it in a switch statement to perform a different action for each HubTile.
private void HubTile_Tap(object sender, System.Windows.Input.GestureEventArgs e)
{
    HubTile tile = (HubTile)sender;
    MessageBox.Show(tile.Title);

    switch(tile.Title)
    {
        case "Sam":
            NavigationService.Navigate(new Uri("DetailsPage1.xaml",UriKind.Relative));
            break;
        case "Bugs":
            NavigationService.Navigate(new Uri("DetailsPage1.xaml",UriKind.Relative));
            break;
    }
}
Using the Windows Phone Toolkit HubTile control
In the August 2011 release of the Windows Phone Toolkit a handy little control has been released that makes it easy to created rotating tiles similar to those that come on the Windows Phone start screen. In this demo, we'll cover how to add a HubTile control to your app and describe the various components of the HubTile.
First off, follow the instructions on CodePlex (http://silverlight.codeplex.com/) to install the Windows Phone Toolkit and create a new Windows Phone project in Visual Studio.
On the page where you want to use the HubTile, add an XML Namespace entry for the Toolkit.
xmlns:toolkit="clr-namespace:Microsoft.Phone.Controls;assembly=Microsoft.Phone.Controls.Toolkit"
The code to add a single HubTile to the page is as follows;
<toolkit:HubTile
    Title="Sam"
    Message="Yosemite Sam"
    Source="/Assets/Images/Yosemite-Sam.jpg"
    Background="{StaticResource PhoneAccentBrush}" />
Basic Properties
Title - Appears on both the front and flip-side of the tile (Sam)
Message - Appears at the top of the flip-side of the tile (Yosemite Sam)
Source - The image to display
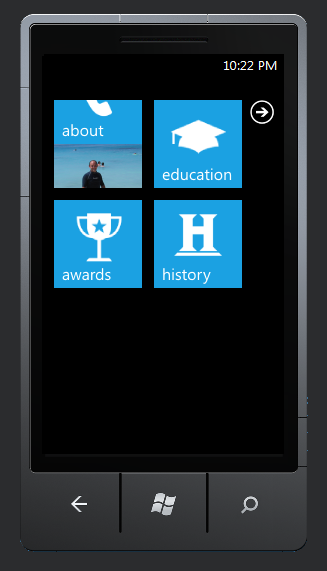
Behaviour
The HubTile cycles through a number of states as shown in the image below. These include displaying only the Source image, a split view of the Source and Title, the front-side view of the Title in large font and the flip-side view.

Obviously, one HubTile on it's own is not that exciting, but by wrapping a number of HubTiles in one of the XAML containers, such as a Grid or StackPanel, you'll soon be on the way to creating a Start Screen-like experience in your own app.
Building a Windows Phone 7 Look-a-like
After viewing some of the fan-mail for Sahas Katta's WP7 resume, I decided to check out just how hard it would be to build a WP7/Metro inspired website. While both Sahas' and my own attempts are not exactly perfect mirrors of the Windows Phone 7 end-user experience, it was certainly an interesting experiment.
Has your boss already bought you an Android? Are you stuck with an iPhone? Do you really wish you could experience a Windows Phone without parting with your hard-earned cash?
Well here is your solution. Take a look at this Windows Phone 7 (Mango-release) inspired site .
The site is constructed using some screenshots from the WP7 emulator and the layout is true to the actual device - trust me, I have spent enough time developing for WP7 that I know these proportions off-by-heart.
Using the Accelerometer#2 Creating a Level
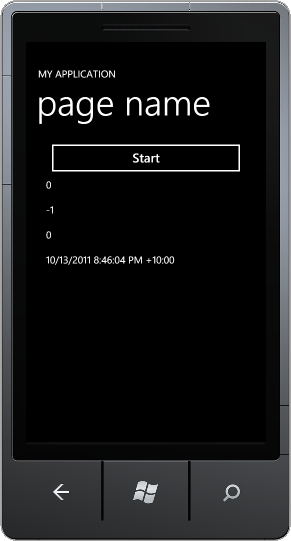
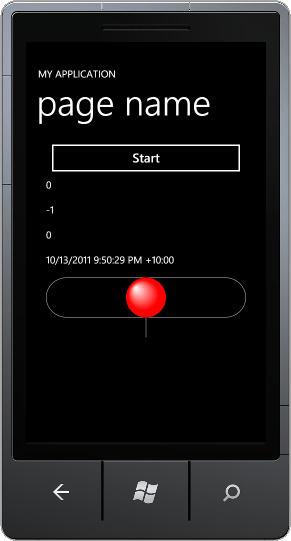
In this post we will extend upon the simple Accelerometer example I looked at in a previous post by actually graphically representing the Accelerometer data on the Windows Phone 7 device. One way to do this is to create a spirit-level – you know the thingy in your toolbox that you use to see if something is level or not!
Thanks to some XAML from Jeff Prosise's Blog we can easily add a spirit-level to the previous application and use it to track the movement of the device relative to one dimension. We add a simple rectangle and a bubble (an Ellipse) to represent how far out of level the device is.
<StackPanel Margin="0" Orientation="Vertical" VerticalAlignment="Top" Width="400">
    <Button Click="Button_Click" Height="78" Content="Start" />
    <TextBlock x:Name="TextBlockX" Height="50" TextWrapping="Wrap" Text="TextBlock"/>
    <TextBlock x:Name="TextBlockY" Height="50" TextWrapping="Wrap" Text="TextBlock"/>
    <TextBlock x:Name="TextBlockZ" Height="50" TextWrapping="Wrap" Text="TextBlock"/>
    <TextBlock x:Name="TextBlockTimeStamp" Height="50" TextWrapping="Wrap" Text="TextBlock"/>
    <Canvas>
        <Rectangle x:Name="Track"
                   Width="400"
                   Height="80"
                   Stroke="#FFC0C0C0"
                   RadiusX="40"
                   RadiusY="40" />
        <Line Stroke="#FFC0C0C0"
                X1="0" Y1="0" X2="0" Y2="120"
                HorizontalAlignment="Center"
                VerticalAlignment="Center"
                Margin="200,0,0,0" />
        <Ellipse x:Name="Ball" Width="80" Height="80" Margin="160,0,0,0">
            <Ellipse.Fill>
                <RadialGradientBrush GradientOrigin="0.234,0.255">
                    <GradientStop Color="White"/>
                    <GradientStop Color="Red" Offset="0.759"/>
                </RadialGradientBrush>
            </Ellipse.Fill>
            <Ellipse.RenderTransform>
                <TranslateTransform x:Name="BallTransform" />
            </Ellipse.RenderTransform>
        </Ellipse>
    </Canvas>
</StackPanel>
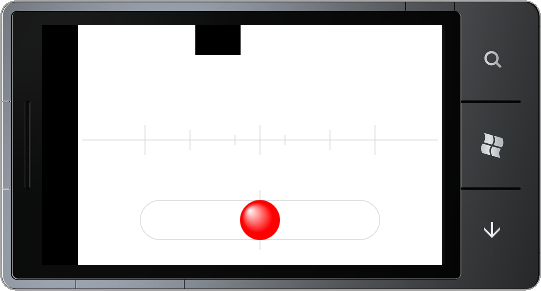
The Rectangle acts as a visual guide helping us understand which way the bubble needs to move before the device is level.
Most real spirit-levels only show the tilt in one dimension at a time, so we’ll only be looking at moving the bubble along the X axis in the example. It is also important to note that the bubble in a spirit-level moves in the opposite direction to the current tilt of the device, so we need to move our Ellipse in a negative X direction.
To graphically display the movement of the device we will use a TranslateTransform transformation named BallTransform to move the bubble to the left or right. This transformation can then be called from the code we created to handle the ReadingChanged event in the previous post.
void MyReadingChanged(AccelerometerReadingEventArgs e)
{
TextBlockX.Text = e.X.ToString();
TextBlockY.Text = e.Y.ToString();
TextBlockZ.Text = e.Z.ToString();
TextBlockTimeStamp.Text = e.Timestamp.ToString();
//New code to move the ball from left to right
BallTransform.X = -e.X * (Track.Width - Ball.Width);
}
Running the app on a WP7 device will display a red ball that moves in the opposite direction to the current tilt of the device, enabling you to find the true level of any object you lay the device on. This may be handy if you need to show the boss that your desk really does lean to the right!
Using the Accelerometer
The Accelerometer is part of the Sensors API, so to you will need to add a reference to Microsoft.Devices.Sensors. You will also want to add a using statement on the pages where you will be using the Accelerometer.
using Microsoft.Devices.Sensors;
Starting the Accelerometer and accessing its values is as simple as many of the other API calls you’ll make in developing a Windows Phone 7 application. In the code behind you declare a local variable of type Accelerometer and call its Start() method.
//declare a local variable
Accelerometer sensor;
private void Button_Click(object sender, RoutedEventArgs e)
{
sensor = new Accelerometer();
sensor.ReadingChanged += new EventHandler<AccelerometerReadingEventArgs>(sensor_ReadingChanged);
sensor.Start();
}
As with most calls to the device API’s, you will need to handle an event whenever the Accelerometer reading changes. As you can see in the code above, we are handling the ReadingChanged event which includes a parameter of class AccelerometerReadingEventArgs. AccelerometerReadingEventArgs contains a number of fields you will need to use in deciding which way the device has been moved, including the X,Y,X and a Timestamp value.
Whenever the readings from Accelerometer change, sensor_ReadingChanged is called, which invokes a background thread to handle the change of values.
void sensor_ReadingChanged(object sender, AccelerometerReadingEventArgs e)
{
//e contains X,Y,Z readings and a timestamp
Dispatcher.BeginInvoke(() => MyReadingChanged(e));
}
void MyReadingChanged(AccelerometerReadingEventArgs e)
{
TextBlockX.Text = e.X.ToString();
TextBlockY.Text = e.Y.ToString();
TextBlockZ.Text = e.Z.ToString();
TextBlockTimeStamp.Text = e.Timestamp.ToString();
}
Running this code will result in the values for X,Y,X and the Timestamp being displayed on the screen in their respective TextBlocks. The emulator can't move, so you will find the results somewhat boring. Running the app on a WP7 device however is a different story. Even when you place the device on a flat surface you will notice that the readings continually change, often many times per second. In a future post we will look at how you can smooth out these readings to obtain information about the general direction of movement.