Making phone calls from your WP7 App
Now while there are tons of great things you can do with a Smart Phone, let’s not forget that at the end of the day, it is a phone. Thankfully, Windows Phone gives developers a couple of easy methods to select contacts and make phone calls. This is extremely useful in app where you provide a list of businesses and you want to provide a way for users to call them directly from you app.
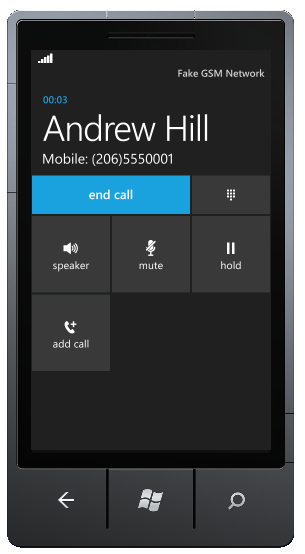
As with other Launcher tasks we’ve looked at, such as EmailComposeTask and WebBrowserTask, the code is very simple. Give the PhoneCallTask a phone number and a display name, and the native phone call app takes over.
private void Button_Click(object sender, RoutedEventArgs e)
{
PhoneCallTask call = new PhoneCallTask();
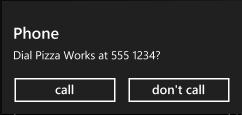
call.DisplayName = "Pizza Works";
call.PhoneNumber = "555 1234";
call.Show();
}
As with many tasks, the user confirms that they want to carry out the selected task. This give them the peace of mind of knowing that they can click around in your app and wont suddenly start a phone call.
Another related feature is the PhoneNumberChooserTask. Unlike launcher tasks, chooser tasks use a native OS app to return values back to your app. We’ve seen them at work in the CameraCaptureTask and PhotoChooserTasks that return an image back to your application. The PhoneNumberChooserTask as you would expect, enables the user to select a contact from phone’s contact application and returns their name and phone number, so that your app can then use the PhoneCallTask to initiate a phone call.
Then main difference in the code for a chooser task is that we have to wire up the Completed event, which is triggered when the user either selects a contact, or cancel out of the contact application.
private void Button_Click(object sender, RoutedEventArgs e)
{
PhoneNumberChooserTask phone = new PhoneNumberChooserTask();
phone.Completed += new EventHandler<PhoneNumberResult>(phone_Completed);
phone.Show();
}
void phone_Completed(object sender, PhoneNumberResult e)
{
//only continue if the user selected a contact
if (e.TaskResult == TaskResult.OK)
{
PhoneCallTask call = new PhoneCallTask();
//e.DisplayName is not returned prior to Mango
call.DisplayName = e.DisplayName;
call.PhoneNumber = e.PhoneNumber;
call.Show();
}
}
WP7 Mango Features #1: BingMapsTask
Now that the Tech-Ed finals for Spotlight2011 are over, I have had the chance to install the Mango pre-release image on my Windows Phone. I had only seen a few of the great new features in videos and a session at Tech-Ed, so it was good to actually get my hands on the real OS. Along with some very cool features from the users perspective, Mango has a host of new and improved features for developers. One that immediately jumped out was the new BingMapsTasks.
If you have ever had to create a WP7 app that uses the Bing Maps API you’ll appreciate that it is not an easy task. In fact, as great as the Windows Phone 7 Developer Labs were, I always struggled with the Bing Maps labs. This was partly due to the fact that the labs chose to use a MVVM pattern, which was completely foreign to me at the time and added a level of complexity that made learning how to use the API overly difficult.
You will be happy to know that the WP7 Mango release has come to your rescue with some new ‘launchers’ specifically designed to leverage the Bing Maps application built into the OS. Similar to the email and camera launchers currently available to Windows Phone developers the BingMapsDirectionsTask and BingMapsTask can be used to directly launch the Bing Maps application.
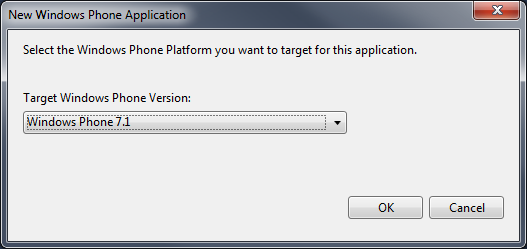
Start a new project and be sure to target the 7.1 Windows Phone OS.
The BingMapsTask is contained in the Microsoft.Phone.Tasks namespace, so you will need to add a using statement to your MainPage.xaml.cs file.
The first task we will look at is the Bing Search, which can be used to find businesses and landmarks located near a particular geographical point. By default, the current location of the device is used for the center of the search however you can specify any geographical location.
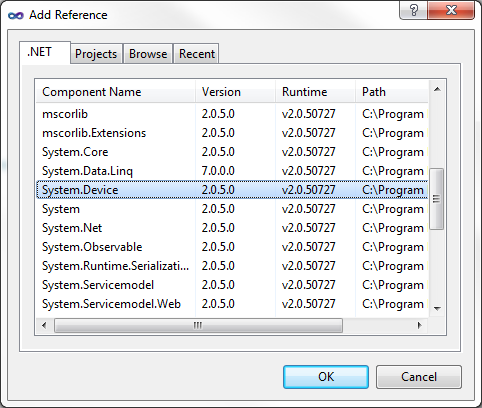
If you are using the emulator then you will want to declare a defined center for your search. To do this, add a reference to the System.Device library by right mouse clicking on the References folder in you project and selecting Add Reference. Once you have added the System.Device library you can add the following using statement to your MainPage.xaml.cs file;
Now you can define the Center for your search be creating a new GeoCoordinate object and setting its Latitude and Longitude to suitable values.
private void Button_Click(object sender, RoutedEventArgs e)
{
    BingMapsTask bmt = new BingMapsTask();
    bmt.Center = new GeoCoordinate(-27.5, 153);
    bmt.SearchTerm = ("coffee");
    bmt.Show();
}
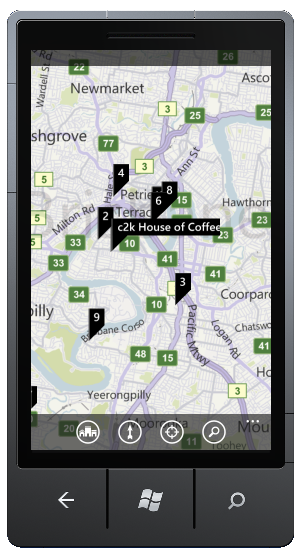
The code results in the Bing Maps app opening, centered at the specified location and showing all matching locations, in this case places related to coffee. The user can then use all the built-in Bing goodness, to browse around the matching businesses and get directions from their current location. All you had to do was write a few lines of code - very nice.
WP7 Mango Features #5: ShareLinkTask
In my last post I looked at how easy it was to add the ability to update your status on social networks such as Windows Live, Twitter and Facebook. An obvious extension of a simple status update is the ability to add a web link. This scenario is supported by most major social networks and it only seems fitting that Windows Phone Mango now offers developers an easy way to achieve the same results.
private void Button_Click(object sender, RoutedEventArgs e)
{
ShareLinkTask link = new ShareLinkTask();
link.Title = "TrafficMATE";
link.LinkUri = new Uri("http://blog.ezidata.com.au/post/Connect-your-app-to-the-Social-Network.aspx");
link.Message = "Traffic Incidents via twitter in Windows Phone Mango #wp7";
link.Show();
}
As with the previous post, the ShareLinkTask only works on a real device, as it relies on the social networks you have linked to the Live account on your Windows Phone. When run on the device, users are again prompted to select which social networks to post the link to and can select from whatever account that currently have linked.

Using the Accelerometer#2 Creating a Level
In this post we will extend upon the simple Accelerometer example I looked at in a previous post by actually graphically representing the Accelerometer data on the Windows Phone 7 device. One way to do this is to create a spirit-level – you know the thingy in your toolbox that you use to see if something is level or not!
Thanks to some XAML from Jeff Prosise's Blog we can easily add a spirit-level to the previous application and use it to track the movement of the device relative to one dimension. We add a simple rectangle and a bubble (an Ellipse) to represent how far out of level the device is.
<StackPanel Margin="0" Orientation="Vertical" VerticalAlignment="Top" Width="400">
    <Button Click="Button_Click" Height="78" Content="Start" />
    <TextBlock x:Name="TextBlockX" Height="50" TextWrapping="Wrap" Text="TextBlock"/>
    <TextBlock x:Name="TextBlockY" Height="50" TextWrapping="Wrap" Text="TextBlock"/>
    <TextBlock x:Name="TextBlockZ" Height="50" TextWrapping="Wrap" Text="TextBlock"/>
    <TextBlock x:Name="TextBlockTimeStamp" Height="50" TextWrapping="Wrap" Text="TextBlock"/>
    <Canvas>
        <Rectangle x:Name="Track"
                   Width="400"
                   Height="80"
                   Stroke="#FFC0C0C0"
                   RadiusX="40"
                   RadiusY="40" />
        <Line Stroke="#FFC0C0C0"
                X1="0" Y1="0" X2="0" Y2="120"
                HorizontalAlignment="Center"
                VerticalAlignment="Center"
                Margin="200,0,0,0" />
        <Ellipse x:Name="Ball" Width="80" Height="80" Margin="160,0,0,0">
            <Ellipse.Fill>
                <RadialGradientBrush GradientOrigin="0.234,0.255">
                    <GradientStop Color="White"/>
                    <GradientStop Color="Red" Offset="0.759"/>
                </RadialGradientBrush>
            </Ellipse.Fill>
            <Ellipse.RenderTransform>
                <TranslateTransform x:Name="BallTransform" />
            </Ellipse.RenderTransform>
        </Ellipse>
    </Canvas>
</StackPanel>
The Rectangle acts as a visual guide helping us understand which way the bubble needs to move before the device is level.
Most real spirit-levels only show the tilt in one dimension at a time, so we’ll only be looking at moving the bubble along the X axis in the example. It is also important to note that the bubble in a spirit-level moves in the opposite direction to the current tilt of the device, so we need to move our Ellipse in a negative X direction.
To graphically display the movement of the device we will use a TranslateTransform transformation named BallTransform to move the bubble to the left or right. This transformation can then be called from the code we created to handle the ReadingChanged event in the previous post.
void MyReadingChanged(AccelerometerReadingEventArgs e)
{
TextBlockX.Text = e.X.ToString();
TextBlockY.Text = e.Y.ToString();
TextBlockZ.Text = e.Z.ToString();
TextBlockTimeStamp.Text = e.Timestamp.ToString();
//New code to move the ball from left to right
BallTransform.X = -e.X * (Track.Width - Ball.Width);
}
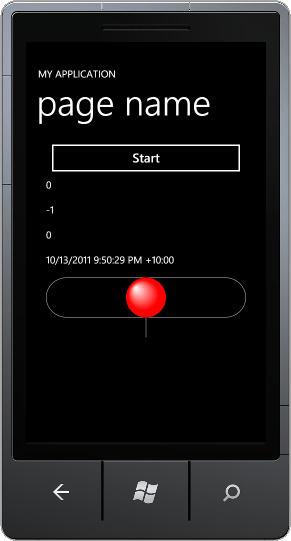
Running the app on a WP7 device will display a red ball that moves in the opposite direction to the current tilt of the device, enabling you to find the true level of any object you lay the device on. This may be handy if you need to show the boss that your desk really does lean to the right!
Using the Accelerometer
The Accelerometer is part of the Sensors API, so to you will need to add a reference to Microsoft.Devices.Sensors. You will also want to add a using statement on the pages where you will be using the Accelerometer.
using Microsoft.Devices.Sensors;
Starting the Accelerometer and accessing its values is as simple as many of the other API calls you’ll make in developing a Windows Phone 7 application. In the code behind you declare a local variable of type Accelerometer and call its Start() method.
//declare a local variable
Accelerometer sensor;
private void Button_Click(object sender, RoutedEventArgs e)
{
sensor = new Accelerometer();
sensor.ReadingChanged += new EventHandler<AccelerometerReadingEventArgs>(sensor_ReadingChanged);
sensor.Start();
}
As with most calls to the device API’s, you will need to handle an event whenever the Accelerometer reading changes. As you can see in the code above, we are handling the ReadingChanged event which includes a parameter of class AccelerometerReadingEventArgs. AccelerometerReadingEventArgs contains a number of fields you will need to use in deciding which way the device has been moved, including the X,Y,X and a Timestamp value.
Whenever the readings from Accelerometer change, sensor_ReadingChanged is called, which invokes a background thread to handle the change of values.
void sensor_ReadingChanged(object sender, AccelerometerReadingEventArgs e)
{
//e contains X,Y,Z readings and a timestamp
Dispatcher.BeginInvoke(() => MyReadingChanged(e));
}
void MyReadingChanged(AccelerometerReadingEventArgs e)
{
TextBlockX.Text = e.X.ToString();
TextBlockY.Text = e.Y.ToString();
TextBlockZ.Text = e.Z.ToString();
TextBlockTimeStamp.Text = e.Timestamp.ToString();
}
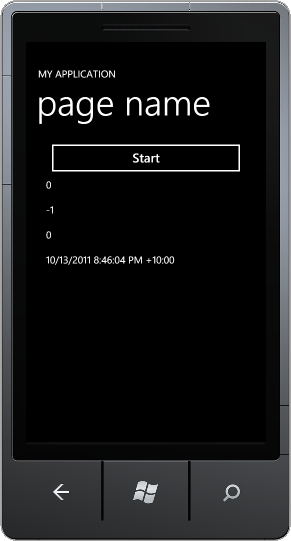
Running this code will result in the values for X,Y,X and the Timestamp being displayed on the screen in their respective TextBlocks. The emulator can't move, so you will find the results somewhat boring. Running the app on a WP7 device however is a different story. Even when you place the device on a flat surface you will notice that the readings continually change, often many times per second. In a future post we will look at how you can smooth out these readings to obtain information about the general direction of movement.
Sending an SMS from Window Phone 7 App
In a previous post I covered how to send emails to one of your contacts directly from a Windows Phone 7 application. WP7 enables you to support a number of other communication channels, including SMS, right inside your application.
private void Button_Click(object sender, RoutedEventArgs e)
{
SmsComposeTask sms = new SmsComposeTask();
sms.To = "555 1234";
sms.Body = "Wow sending an sms from WP7 is so easy";
sms.Show();
}
While it is possible to send an SMS message directly to a mobile number (as shown in the code above), it would normally be preferable to allow the user to select one of their contacts before sending the message.
private void Button_Click(object sender, RoutedEventArgs e)
{
PhoneNumberChooserTask phone = new PhoneNumberChooserTask();
phone.Completed += new EventHandler<PhoneNumberResult>(phone_Completed);
phone.Show();
}
void phone_Completed(object sender, PhoneNumberResult e)
{
//only continue if the user selected a contact
if (e.TaskResult == TaskResult.OK)
{
SmsComposeTask sms = new SmsComposeTask();
sms.To = e.PhoneNumber;
sms.Body = "Wow sending an sms from WP7 is so easy";
sms.Show();
}
}
The SMSComposeTask launches the messaging application on the OS and displays the new message. As with all the other Launcher tasks we have investigated, the user has the option to edit the message or even cancel sending it altogether.
Stirling Database for Windows Phone 7
When I first started developing Windows Phone 7 apps I used the tried and tested approach to saving data using serialization into XML. This worked fine for apps that only required a small amount of data or for saving application settings, but I soon realised that when storing and retrieving large amounts of data I would need something a little better.
A little research pointed me towards the Stirling Isolated Storage Database. To test out the capabilities I decided to modify a small app I had created that was currently using XML serialization before diving in and updating some of the more complex apps I had in development.
About the App
The app I chose to upgrade was an Issue Tracking and Lodgement application designed to allow inspectors to record and lodge issues, such as vandelism and asset damage via a webservice into the corporate asset management system. Each issue is stored locally as well as being uploaded via the webservice and as the number of these issues grows, the amount of data being strored and retrieved can become significant.
The app consists of a number of data capture pages where an inspector can take photos and record the details of the issue. There is a simple IssueModel class that is used to define the data captured, including a unique Guid ID.
public Guid ID { get; set; }

public string Problem { get; set; }

public string AssetType { get; set; }

public string Cause { get; set; }

public string Remedy { get; set; }

public Double Latitude { get; set; }

public Double Longitude { get; set; }
Getting Started
Open your Windows Phone 7 project and Add a reference to Wintellect.Sterling.WindowsPhone – this library will be created when you build the sample solution downloaded from Codeplex.
So you can access the database from whereever you need it in your app, add the following using statement and variables for the DatabaseEngine, Logger and Instance.
using Wintellect.Sterling;
...
private static ISterlingDatabaseInstance _database = null;
private static SterlingEngine _engine = null;
private static SterlingDefaultLogger _logger = null;
Create a property in your App.xaml.cs with a return value of ISterlingDatabaseInstance that will be used to gain access to your database within your app.
public static ISterlingDatabaseInstance Database
{
    get
    {
        return _database;
    }
}
Add a new class to your project and make it derive from BaseDatabaseInstance. This class is used to define your table definitions, triggers and other database elements. The bulk of the work in this class is done in the _RegisterTables() function. This is where you define your tables, based on the Objects or Models you are using in your app - in our example we have one Model named IssueModel.
public class IssuesDatabase : BaseDatabaseInstance
{
    public override string Name
    {
        get { return "IssuesDatabase"; }
    }

    protected override System.Collections.Generic.List<ITableDefinition> _RegisterTables()
    {
        return new System.Collections.Generic.List<ITableDefinition>
        {
            CreateTableDefinition<IssueModel,Guid>(i=>i.ID)
        };
    }
}
Back in the App.xaml.cs file you will also need to create a couple of functions that activate and deactivate the database engine. These are the _ActivateEngine() and _DeactivateEngine() in the App.xaml.cs file found in the sample Windows Phone 7 project you downloaded from Codeplex. I have modified these for our example - you will notice in the _ActivateEngine code that we are registering a database called IssuesDatabase that we created in the previous step.
private void _ActivateEngine()
{
    _engine = new SterlingEngine();
    _logger = new SterlingDefaultLogger(SterlingLogLevel.Information);
    _engine.Activate();
    _database = _engine.SterlingDatabase.RegisterDatabase<IssuesDatabase>();
}

private void _DeactivateEngine()
{
    _logger.Detach();
    _engine.Dispose();
    _database = null;
    _engine = null;
}
Saving Records
The next step is to modify your method of saving data. Thankfully I had created a helper class to load and save IssueModel objects, so I was able to modify the existing functions very easily. The original Save function shown below serialized a List<IssueModel> object into a file called Issues.xml that was saved in Isolated Storage.
public void Save(List<IssueModel> items)
{
    using (IsolatedStorageFile isf =
        IsolatedStorageFile.GetUserStoreForApplication())
    {
        using (IsolatedStorageFileStream stream = isf.OpenFile("Issues.xml", System.IO.FileMode.Create))
        {
            StreamWriter writer = new StreamWriter(stream);
            XmlSerializer xs = new XmlSerializer(typeof(List<IssueModel>));
            xs.Serialize(writer, items);
            writer.Close();
        }
    }
}
We no longer need to load and save the entire set of data, so we can modify the the function to save a single IssueModel object. Obviously if you still want to save a list of objects you can use a foreach loop to step through the List and save each item.
public static void Save(IssueModel item)
{
    App.Database.Save<IssueModel>(item);
    App.Database.Flush();
}
Loading Records
Modifying the Load function was only slightly more complex. The original Load function deserialized an XML file named Issues.xml that was saved in Isolated Storage and returned a List<T> object.
public static List<IssueModel> Load()
{
    List<IssueModel> _items = new List<IssueModel>();

    using (IsolatedStorageFile isf =
        IsolatedStorageFile.GetUserStoreForApplication())
    {
        using (IsolatedStorageFileStream stream = isf.OpenFile("Issues.xml", System.IO.FileMode.OpenOrCreate))
        {
            if (stream.Length > 0)
            {
                StreamReader reader = new StreamReader(stream);
                XmlSerializer xs = new XmlSerializer(typeof(List<IssueModel>));
                _items = (List<IssueModel>)xs.Deserialize(reader);
                reader.Close();
            }
        }
    }

    if (_items==null)
        return new List<IssueModel>();
    else
        return _items;
}
It is still appropriate in this example to return a List<T> object, however we have to load this List with data from the database using the Stirling Query commands.
public static List<IssueModel> Load()
{
    List<IssueModel> _items = new List<IssueModel>();

    //load all IssueModel objects from the Database
    foreach (var item in App.Database.Query<IssueModel, Guid>())
    {
        _items.Add(item.LazyValue.Value);
    }

    return _items;
}
Conclusion
By modifying the helper class that is used to Load and Save our Model, we have been able to implement the Stirling Isolated Storage Database without significant disruption to our Views. By including the Database property in out App.xaml.cs file we can now have access to the database from any class within our project. The next step is to utilise Stirling's support of LINQ to develop other functions that return filtered lists of objects - but that is left for another day.
Send email to a contact from your WP7 App
In a previous post I showed you how easy it is to send an email from within your Windows Phone application. In that post I focussed on the EmailComposeTask, that is used to launch the native email application and prepopulate fields such as the To address, subject and body.
When I built the DVDLibrary app I decided to include the ability to email directly from the app, specifically so that users could inform their fiends about movies they had, or wanted to get. In this scenario it made sense to use the EmailAddressChooserTask before calling the EmailComposeTask, so that the user could select one of their contacts to send the email to.
private void Button_Click(object sender, RoutedEventArgs e)
{
EmailAddressChooserTask email = new EmailAddressChooserTask();
email.Completed += new EventHandler<EmailResult>(email_Completed);
email.Show();
}
void email_Completed(object sender, EmailResult e)
{
//only continue if the user selected a contact
if (e.TaskResult == TaskResult.OK)
{
//you could also use values from you app
//such as the product or business selected
EmailComposeTask em = new EmailComposeTask();
em.To = e.Email;
em.Subject = "This is a great movie";
em.Body = "Check out this great movie...";
}
}

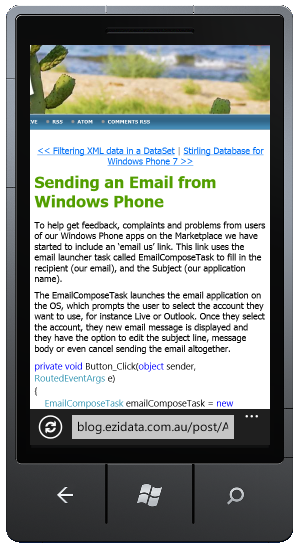
Sending an Email from Windows Phone
To help get feedback, complaints and problems from users of our Windows Phone apps on the Marketplace we have started to include an ‘email us’ link. This link uses the email launcher task called EmailComposeTask to fill in the recipient (our email), and the Subject (our application name).
The EmailComposeTask launches the email application on the OS, which prompts the user to select the account they want to use, for instance Live or Outlook. Once they select the account, they new email message is displayed and they have the option to edit the subject line, message body or even cancel sending the email altogether.
private void Button_Click(object sender, RoutedEventArgs e)
{
EmailComposeTask emailComposeTask = new EmailComposeTask();
emailComposeTask.To = "sales@GreatApp.com";
emailComposeTask.Body = "I love this application";
emailComposeTask.Subject = "Great App";
emailComposeTask.Show();
}
Browsing the Web from Windows Phone Apps
There are times when creating a WP7 app that it simply doesn’t make sense to recreate content that already exists on the web. One of these times is displaying content for a privacy statement that is a Marketplace requirement if you are accessing the user’s location. Rather than write out page after page of boring legal jargon in every app, it’s much easier to link to a single web page that contains your privacy statement.
The WebBrowserTask is ideal for these times when you want to display content from a web page. As the code below shows, it’s extremely easy to launch the browser, all you need to do is set the Uri and the built-in browser handles the rest.
private void Button_Click(object sender, RoutedEventArgs e)
{
WebBrowserTask browse = new WebBrowserTask();
browse.Uri = new Uri("http://blog.ezidata.com.au");
browse.Show();
}