Asset Management #1 - Getting users location
While building a recent asset management app for mobile field staff, I had to create a page where they could lodge defects. Part of the lodgement process required them to select the location of the defect (latitude/longitude) and enter the physical street address.
The original HTML5 app that I built used the javascript version of Nokia HERE maps that enabled the field staff to perform these tasks, but moving to Windows Phone 8 meant that this could now be handled by the new API features.
The first step to achieve this is to add a Map control to your XAML page, remembering to include the Microsoft.Phone.Maps.Control XML namespace in the page declaration.
xmlns:maps="clr-namespace:Microsoft.Phone.Maps.Controls;assembly=Microsoft.Phone.Maps"
<maps:Map x:Name="LocationMap" />
When the user opened the page, I wanted the map to zoom to their current location to make it as quick as possible to select the asset that needed fixing. To do this, we need to initialise a Geolocator, which can be used to return the current location.
using Windows.Devices.Geolocation;
Override the OnNavigatedTo to get the current location and center the map
protected async override void OnNavigatedTo(NavigationEventArgs e)
{
    // get current location
    Geolocator locator = new Geolocator();
    Geoposition position = await locator.GetGeopositionAsync();
    var location = position.Coordinate.ToGeoCoordinate();

    // center the map at the current location
    LocationMap.Center = location;
    LocationMap.ZoomLevel = 18;

    base.OnNavigatedTo(e);
}
One catch with this process is that the classes used to represent a location from the Geolocator and the Map are similar, but actually different. The Geolocator returns a Windows.Devices.Geolocation.Geocoordinate objects, but to use this on a map we need a System.Device.Location.GeoCoordinate.
While it’s possible to write your own converter, the Windows Phone Toolkit provides a handy map extension that does the conversion for us. You’ll need to add a reference to the Toolkit in your code-behind.
using Microsoft.Phone.Maps.Toolkit;
Then you can call the ToGeoCoordinate() extension method of the Geocoordinate class.
Before testing your app, be sure to set the ID_CAP_LOCATION capability for you app in the WMAppManifest or you'll get an exception.
Windows Phone 8 - The new map services
One of the really nice enhancements that have been made to the mapping capabilities in the Windows Phone 8 SDK is the addition of services such as geocoding and reverse geocoding, which are functions that are often required when building map-based solutions.
I wrote a post some time ago showing how you could utilise the Bing Maps API to perform these tasks, but in WP8, they’re built in to the SDK. GeocodeQuery and ReverseGeocodeQuery are two classes in the new Microsoft.Phone.Maps.Services namespace that provide these function.
GeocodeQuery
Geocoding is the process of retrieving a geographical location (latitude/longitude) when provided a physical address, such as a street and suburb name. You’d use geocoding in your app if you want users to enter an address in a textbox and then see that displayed on a map.
The code to perform a GeocodeQuery couldn't be much easier. Assuming you have a TextBox name SearchTextBox where the user will enter the address to query and a Button that they press, your code to perform the query will look as simple as this.
private void SearchButton_Click(object sender, RoutedEventArgs e)
{
    GeocodeQuery query = new GeocodeQuery();
    query.SearchTerm = SearchTextBox.Text;
    query.GeoCoordinate = new System.Device.Location.GeoCoordinate(-27.5, 153);
    query.QueryCompleted += query_QueryCompleted;
    query.QueryAsync();
}
You will need to decide how to handle the results of the query, which if successful will be a list of MapLocation objects. For this example we'll just display the street address of the first record, but obviously you could display the results in a list and let the user select the relevant record.
void query_QueryCompleted(object sender, QueryCompletedEventArgs<IList<MapLocation>> e)
{
    //check that the query didn't raise an exception
    if(e.Error==null)
    {
        //grab the first location//
        if (e.Result.Count() > 0)
        {
            var location = e.Result.FirstOrDefault();
            MessageBox.Show(location.Information.Address.Street);
        }
    }
}
The MapLocation class contains a number of properties, including GeoCoordinate (latitide/longitude) and Information. The Information property returns a LocationInformation object that can be used to retrieve values such as the Address, Description and Name of the location. Depending on the addres that was entered, not all of these values will be populated. For example, if the user enters a regular suburban address, only the Address property is populated.
ReverseGeocodeQuery
As the name suggests, reverse geocoding is the process of retrieving a physical address (street/suburb) when provided a geographical location (latitude/longitude). You’d use reverse-geocoding in your app if you wanted users to be able to tap a point on a map and see what the address is.
To illustrate the code to perform a ReverseGeocodeQuery, we’ll need a simple UI that allows a user to select a location on a map. You can either add a map via code or in XAML, but we’ll use XAML for this example.
Firstly add the XML namespace to your page declaration.
xmlns:maps="clr-namespace:Microsoft.Phone.Maps.Controls;assembly=Microsoft.Phone.Maps"
Add a map control and set an appropriate Center and ZoomLevel and add the Tap event handler.
<maps:Map x:Name="LocationMap" Center="-27.5, 153" ZoomLevel="10" Tap="LocationMap_Tap" />
Next we’ll need to handle the Tap event, which will be triggered when the user taps the map.
private void LocationMap_Tap(object sender, System.Windows.Input.GestureEventArgs e)
{
    //get the location of the Tap
    GeoCoordinate location = LocationMap.ConvertViewportPointToGeoCoordinate(e.GetPosition(LocationMap));

    //reverse geocode the location
    ReverseGeocodeQuery reverse = new ReverseGeocodeQuery();
    reverse.GeoCoordinate = location;
    reverse.QueryCompleted += reverse_QueryCompleted;
    reverse.QueryAsync();
}
Lastly, you'll want to handle the callback from when the query completes. This could be as simple or as complex as you like, but for this example we'll just show the street name of the location.
void reverse_QueryCompleted(object sender, QueryCompletedEventArgs<IList<MapLocation>> e)
{
    // do something with the address
    if(e.Error==null)
    {
        //grab the first location
        if (e.Result.Count() > 0)
        {
            var location = e.Result.FirstOrDefault();
            MessageBox.Show(location.Information.Address.Street);
        }
    }
}
Windows Phone 8 - The new map tasks
With the release of Windows Phone 8, Microsoft has added a new map control and related mapping tasks. Windows Phone 7 used the BingMapControl and provided a number of Tasks that provided access to the built-in maps app from within your app. I discussed the BinMapsTask and the BingMapsDirectionTask in a couple of previous posts.
While still available in your Windows Phone 8 apps, the Bing-flavoured map control and tasks are deprecated and should not be used for any new development.
Thankfully, replacing the Task is an extremely process and they provide the exact same functionality.
The Maps task opens the built-in map app at a specified location and can be used to search for local results, such as restaurants or coffee houses. You call this function in the exact same way as the old BingMapsTask.
//the old
//BingMapsDirectionsTask dir = new BingMapsDirectionsTask();
//dir.End = new LabeledMapLocation("Address", new GeoCoordinate(-27.3, 152.9));
//dir.Show();

//the new
MapsDirectionsTask dir = new MapsDirectionsTask();
dir.End = new LabeledMapLocation("Address", new GeoCoordinate(-27.3, 152.9));
dir.Show();
The Maps directions task can be called from your app and launches the built-in maps app to provide directions to a specified location. You call this function in the exact same way as the old BingMapsDirectionTask.
//the old
//BingMapsTask search = new BingMapsTask();
//search.Center = new GeoCoordinate(-27.5, 153);
//search.SearchTerm = "coffee";
//search.Show();

//the new
MapsTask search = new MapsTask();
search.Center = new GeoCoordinate(-27.5, 153);
search.SearchTerm = "coffee";
search.Show();
A new way to edit your app settings
As part of the recent changes to the Windows Phone SDK, Microsoft has kindly added a user interface for editing your app’s manifest file.
Back in Windows Phone 7/Visual Studio 2010 days, when you wanted to define the capabilities your app required, or make other configuration changes, you had to edit the XML directly in the WMAppManifest file.
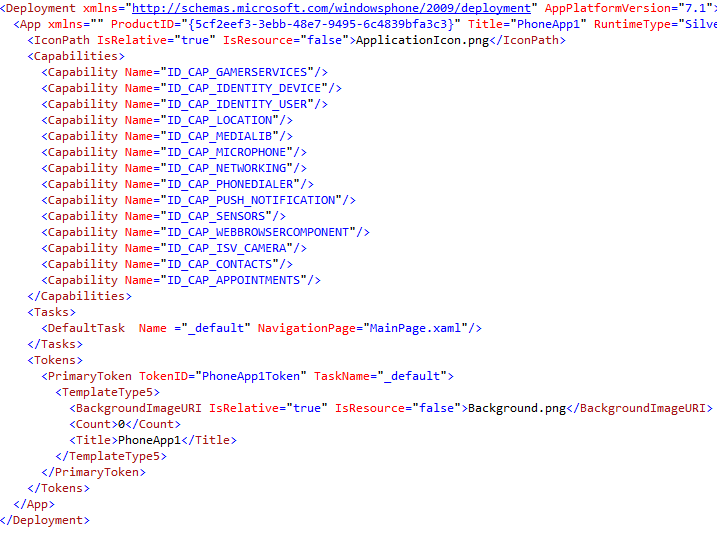
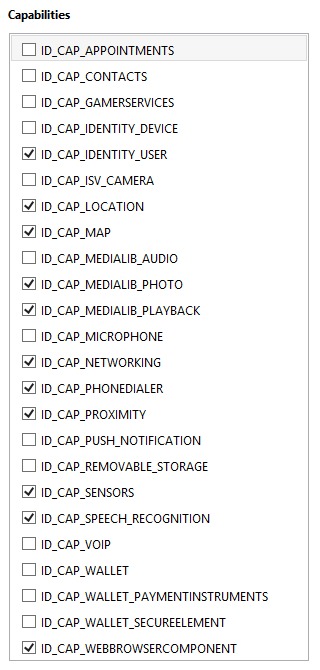
The Windows Phone 8 SDK now includes a nice little manifest designer, which is not only a nice touch, but pretty much required now that there is a raft of new properties that you can set.
Double clicking the WMAppMenifest file in your Visual Studio project will automatically open the manifest designer, instead of the XML source. The various settings in the manifest are available from one of the tabbed sections of the manifest designer.
Windows Phone 8 – First Look at the SDK
So like many Windows developers I have been waiting (not so patiently) for the release of the Windows Phone 8 SDK. Like many, I questioned Microsoft's delay at releasing the SDK to the developer community and wondered why it had taken them so long.
Having downloaded the SDK after its Tuesday release and thrown together a quick sample project, I can honestly say that I am impressed. What has impressed me the most is the quality of the emulator. The Windows Phone 7 emulator helped you develop apps by providing the hooks to many of the built in features, such as contacts and the camera, but these were only available when you called specific methods of the API. For instance, you only had access to the contacts list when you called one of the chooser tasks, such as the email address chooser task. In the Windows Phone 8 SDK all this has changed. The emulator provides what can only be described as the complete phone OS in a virtual machine.
As I fired up my first WP8 app (using one of the ready-to-run templates) I was more interesting in hitting the Windows key on the emulator and exploring the WP8 interface than I was on getting down-and-dirty with the XAML or c# code. To say that I was impressed is an understatement. As I said to a colleague, if I could pick up my laptop and start making calls I'd be running this baby everywhere.
Start Screen
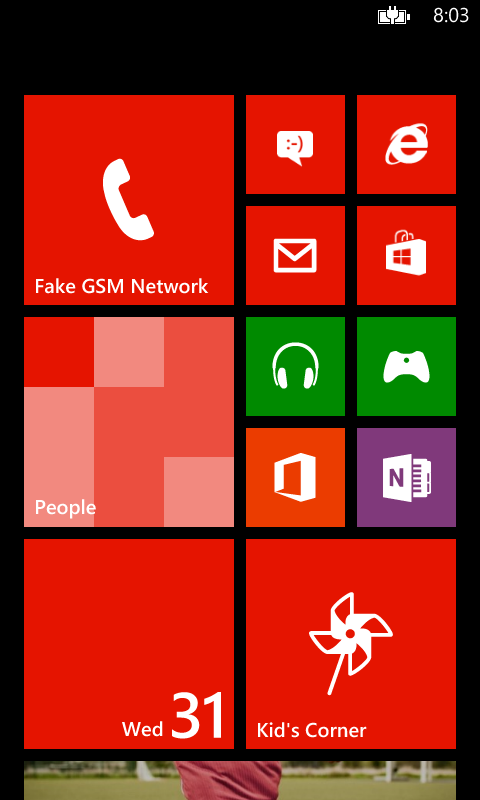
The most obvious change between WP7 and WP8 is the start screen. Gone is the "waste of space" (as one buddy called it) at the right hand side and in its place is a full-screen of customizable live-tiles that enable you to make YOUR Windows Phone truly yours. No longer are you stuck with the grid of 62x62 pixel tiles. You can now choose from three sizes depending on the importance you place on the application the tile refers to. Spend all your time texting your friends, then you'll want the Messaging tile huge.
Kid's Corner
As the father of a 4-year old, I can't tell you how excited I was when I first read about the Kid's Corner feature on Windows Phone 8. Comments from popular blogs and IT news sites tended to be split into two camps. Those who thought having a save place for your kids to play was great and those who thought you were stupid for giving your expensive smart phone to a child. Obviously the latter seldom spend any time with children.
I love the idea of being able to let my son play games while we face those unavoidable delays, such as doctor's surgery rooms or the hairdresser. The fact that he can play and I don't have to worry about him pressing the wrong combination of buttons and making a long-distance means I can relax and not be a helicopter parent.
So how does Kid's Corner Work?
Pressing the Kid's Corner tile on the start screen will enable you to configure the apps, games and music you want your children to have access to. The configuration tool will also prompt you to set a password for the lock screen, so that if your kids turn out to be ultra-smart (as most do) and figure out the different swipe gesture required to enter with 'full-permissions', you'll be safe.
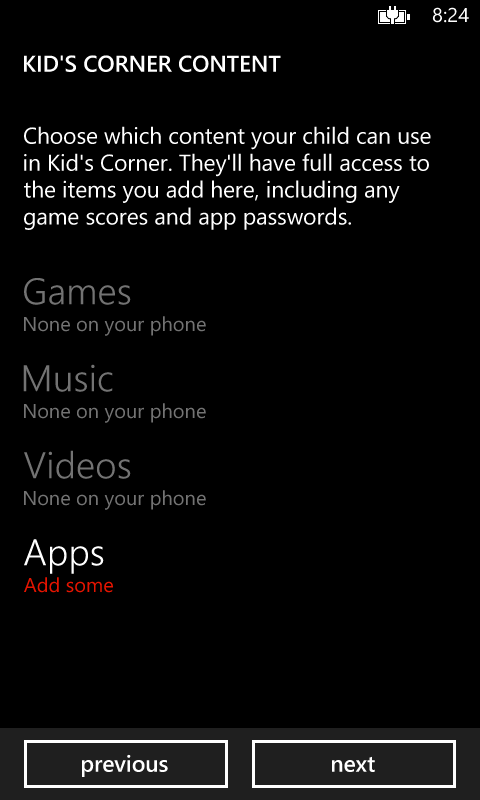
Once configured, Kid's Corner can be access by swiping left on the lock screen. Once the little-ones have played all the games you want, you can exit Kid's Corner by pressing power button. Once you're back to the familiar lock screen, enter your password to unlock the phone with full permissions.
Now where's a REAL device?
After about 10-minute I was staring at my newly un-remarkable WP7 Nokia 800 and wondering how I could get me hands on a Windows Phone 8 device. Sadly the news is not good. After all the waiting, anticipation and even more waiting, I still won't be able to get a device from my carrier (or any other carrier in Australia) for quite a while yet. My phone is out of contract and I am ready to buy, but neither love nor money will have me showing off a WP8 device any time soon to my Android totting colleagues. Damn, that Samsung ATIV S looks really great – shame it's exclusive to Optus (who chose to forget my neck-of-the-woods when building towers).
Resizing the HubTile Control
One common task is to make the HubTile larger, to provide better proportions on a single page. The original HubTile is modelled after the live tiles on the Windows Phone 7 start screen, so it was set at a size of 173x173. This works fine on the start screen, but on a single page inside your app it will feel a little awkward with the blank space on the right hand side.
In Blend, right click on the AvatarListView in the Objects and Timeline panel. Edit Additional Template - Edit Generated Items (ItemTemplate) - Edit a Copy. Give your template a name (AvatarItemTemplate) and accept the default to define it in the current document.
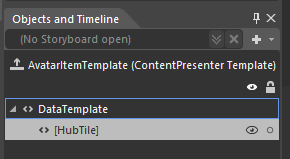
Next, right click on the HubTile element in the Objects and Timeline panel and choose Edit Template - Edit a copy and name it AvatarHubTileStyle.
This will create a new control template based on the original HubTile. Your AvatarHubTileStyle will contain a number of elements as shown in the picture below.
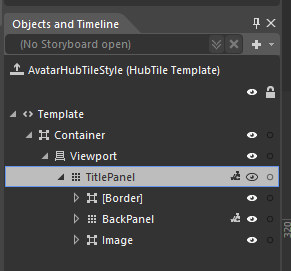
If you click on the TitlePanel element, you see that the magic of the HubTile is really just made up of three different elements a Border, BackPanel (a Grid) and an Image (inside a Border). Animations are used to move and flip these elements to give them the "Live Tile" feel.
Now that you have your own version of the HubTile to play with, you are only limited by your imagination as to how you want it to be rendered.
Skype Beta on Windows Phone 7
Like many people, I was glad to hear in February that there was finally a WP7 app for Skype (beta version). Although I don't personally have much need to use Skype, I appreciate just how powerful it can be for both cheap international calls and video calling.
I downloaded the Skype Beta from the link provided on their blog and gave it a run on my HTC Mozart. It looked ok, I could certainly see the few contacts I had on Skype, but I didn't really give it a second thought. That was until I was in Thailand recently and again thought how great cheap (free) video calling would be for communicating with friends and family while on vacation (or living as an expat). My 4-year old son is pretty good on the phone, but I knew that if he could see daddy while talking, the conversation would be far more free-flowing.
First-things-first, most of you will know that there are no Windows Phones out there with front facing cameras, so it's a bit of guesswork figuring out if your face is actually in the frame when placing a video call. I managed to get it working ok, but eventually I just connected my laptop to the phone's Wi-Fi and used a regular webcam, which made it a whole lot easier. Perhaps the fatal flaw with the current Beta version is that it does not work in the background, so even if you have opened the app and signed in as soon as you go back to the start screen or open another app, it is game over.
Once I got home I was testing the app a little further and I was even more horrified. I started the Skype app on my Nokia Lumia 800 and logged in, making sure it had time to get all the latest info before pressing the Windows key to go back to the start screen. I then Skype called myself from my old HTC Mozart. As expected the Lumia 800 did nothing, even the Skype page on the Windows Phone Marketplace makes it clear that the app doesn't run in the background. What annoyed me the most was that my iPad2, which was being used by my wife to watch some movie trailers on YouTube, got the call!
Where is the sense in all this? Why does Skype, a company bought by Microsoft in 2011 for a bucket of cash (US$8.5 Billion), take so long to deliver what is effectively a test app for Windows Phone? I mean, how serious is their commitment to Windows Phone? Do they expect you to have the app open waiting for a call? Maybe the execs at MS and Skype thought it quite reasonable to expect users to call, text or tweet each other to let them know to open the app. Maybe a text along the lines of "Hi honey, about to Skype you to remember to buy milk, can you please start the Skype app".
By the way, I love my Windows Phone and would dearly love to see the whole ecosystem evolve. It offers so much already built-in (baked-in) in terms of email, calendar and social networking that there's not a lot more I could want. One of my favourite things (and certainly my best argument when chatting at work with the iPhone/Android mob) is that I have downloaded hardly any apps because the OS provides so much already. Skype is currently not part of that great experience and it needs to be – really, really soon – if Windows Phone is to have a chance. Skype, if you need a hand let me know (jobs at ezidata.com.au) – I would be only too happy to assist!
Sharing Your Internet Connection on a Windows Phone
We recently spent a week on vacation in Chiang Mai, Thailand. My wife had a couple of university assignments to submit and, as we wanted to use Skype as much as possible to keep in contact with family back home, having an internet connection was important.
Internet access at our hotel was charged at a ridiculous rate (80THB for 30-minutes) so as soon as we got to Chiang Mai we went to the mall, attached to the hotel and bought a DTAC ‘Happy Tourist’ SIM card. Having researched the Happy website, this looked like a good match for our needs as it had an option to get a full week of 3G internet for 199THB. The SIM comes in two varieties, 49THB or 99THB, the later with more included calls. The only problem was that the retailer sold us the 49THB SIM for 99THB, which I didn’t realise until we got back to the room and activated the card.
I put the SIM card into my old HTC Mozart, almost instantly got messages from Happy that our service was active and tried to connect to the internet. Although the phone had service, I couldn’t get on the internet so I called the service number and finally spoke to a customer service rep who advised me that I needed to restart the phone - damn why didn’t I think of that (maybe because I have never needed to restart the phone for anything else).
The Happy Tourist SIM gives you the first day’s internet connection for free, so we tested sharing the connection between my phone and laptop and it was working smoothly. We then milked our free internet for all that it was worth.
Internet Sharing was rolled out to Windows Phone as part of the Mango update and you’ll find the option in the Settings menu. I believe it must also be supported by your carrier. When you enable Internet Sharing, the phone creates a SSID for the Wi-Fi service and provides you with a password that you will need to use to connect from other devices.
Connection speeds here in Chiang Mai, even sharing the connection over Wi-Fi seem good. From the laptop tethered to my HTC www.speedtest.net said I was getting .98 Mbps down/.78Mbps up when connecting to Thailand-based servers. Connecting to servers in the USA, speedtest.adslthailand.com showed I was getting .78Mbps down/ .51Mbps up.
One disappointment with the Happy website is that you can’t top-up your account on the web using a credit card, so you need to purchase a top-up card from one of the retailers, such as 7-11.
You also appear to have to keep credit on your phone otherwise you lose your service. Even though we had already purchased the 7-day internet package, our phone balance hit 0 on the last day and no matter how hard I tried, I could not connect to the internet. As soon as I put another 100THB credit on the phone, the internet was up and running again.
Nokia Drive
As mentioned in the previous post I have just received a Nokia Lumia 800 and am now able to test out some of the great Nokia WP7 apps, including Nokia Drive. Ever since the rumours and leaked screenshots of the WP7 powered Nokia appeared on the web I have wanted to take the Nokia Drive app out for a spin. Like many people, I don't really need a dedicated GPS/navigation device like a Navman very often as I drive the same route to work every day, but it certainly is nice to have.
Having turn-by-turn, voice navigation really did help when I was on a family vacation in the USA recently and there are times when I do venture outside my comfort zone in Brisbane, so getting accurate and easy-to-use information is important. With Nokia Drive I seem to get the best of both worlds. I don't have a dedicated device sitting there waiting for the few times I need it, but I do get a good navigation system, with all the features I need, available on my ever present smartphone.
First Test
When you first start Nokia Drive, you will want to be connected to the web via a WIFI connection, as it will download maps relevant to your geographical location. When I selected Australia for the map location, the app told me I needed to download 200MB of data – that's a fair chunk of my monthly data limit on the phone.
Once downloaded, the app had no problem showing my current location on the map in a very short period of time (less than 20 seconds). Finding my destination did prove a little problematic though as the address search did not return any values for the street address I entered. I have seen this in the past when working on TrafficMATE. The Bing Map API and geocoding seems to be very strict about how you enter your address. I live in a Circuit, which is often abbreviated Cct. Nokia Drive found no results for both Circuit and Cct, but did find a match for Cirt – an abbreviation I have never seen used.
I used Nokia Drive to guide me home on my regular commute, which of course I knew all too well. I thought it would be interesting to see how well it preformed. The app performed its' task as expected, giving ample instruction about when and where you needed to go. It even appeared to give lane-assistance, telling me to "continue-right" when I was continuing on through an interchange where the left lane exited.
Of course having your GPS/navigation system sitting on the seat next to you is of limited use, so to get the most of the system you will need to put your Lumia in a cradle, but it certainly did everything I expected.
Final Thought
Ideally Nokia Drive would be integrated with other parts of the WP7 operating system so that you could get directions and start the app directly from the relevant areas. This would certainly speed up entering your destination and really does seem like a logical extension of the current 'map home address' feature available from the People Hub.
Nokia Lumia 800
Today I finally got my hands on the much hyped Nokia Lumia 800. I had been very tempted to jump on a plane and head to London when these devices were first launched in Europe and I can say that it has been worth the wait. It makes my poor old HTC Mozart look and feel like a dinosaur.
The Nokia Lumia 800 came as a result of a recent completion Microsoft and Nokia ran where the first 50 developers to publish 3-4 new apps would get one of the Nokias (Lumia 710 for 3 apps and the 800 for 4 apps). While the 710 looked great too, I was keen to get my hands on the 800, so even though it meant quite a bit more work, I eventually got all four apps submitted and approved on the Marketplace.
First Thoughts
Wow this is solid!
Having read about the Lumia 800's solid polymer body (plastic), I thought it might feel light and flimsy, however I was pleasantly surprised, it felt solid and strong. It was heavier than my Mozart and about the same as the iPhone 4s I have at work.
Cool it comes with a case!
Even though the polymer body looks absolutely stunning, the dints and scratches on my Mozart are testament to the rough treatment the modern smartphone must endure. Nokia have thought of this and provided a snug-fitting, rubberised cover (Soft cover) that protects the side and rear of the device. Compared to some of the covers I've seen on iPhone's, this one actually looks like it's meant to be there. In fact, if you didn't know any better, you would think that it was actually part of the body.
What's this 1 – 2 business!
After spinning the phone around and checking out all the vital parts, I discovered some rather intriguing text on the top of the device; 1 - push, 2 - slide. Having not bothered reading the quick-start guide, I fumbled around for a while before I finally opened the micro USB port (1 – push) and the micro SIM card holder (2 – slide). Thankfully you don't change your sim all that often, but I did think the flap covering the USB port was a little over engineered. To be truthful, I loved that my Mozart didn't have a cover at all as it made it so easy to connect the cable – something you do all the time when you are deploying apps to your development device.
Is it just me or does that screen look amazing!
Now I know my poor old Mozart has seen better days, but the AMOLED screen on the Lumia 800 is really amazing. Black really is black and the colours are much deeper too. I will not even bother pretending to know why this is, but the result is stunning, you can barely tell where the screen ends and the surround begins – they just meld together.
Over the next few days I am sure I will get the chance to try out some of the Nokia apps, such as Nokia Drive, Nokia Music and Nokia Maps, but for now just let's say that I am one happy camper.